Wednesday, July 31, 2013

Custom-made Crochet Items

I don't usually take orders for crochet items since I'd like to take the time to just sit down, do some research and use my imagination to create something new. Also, I tend to be stressed-out if I have to finish on a deadline.
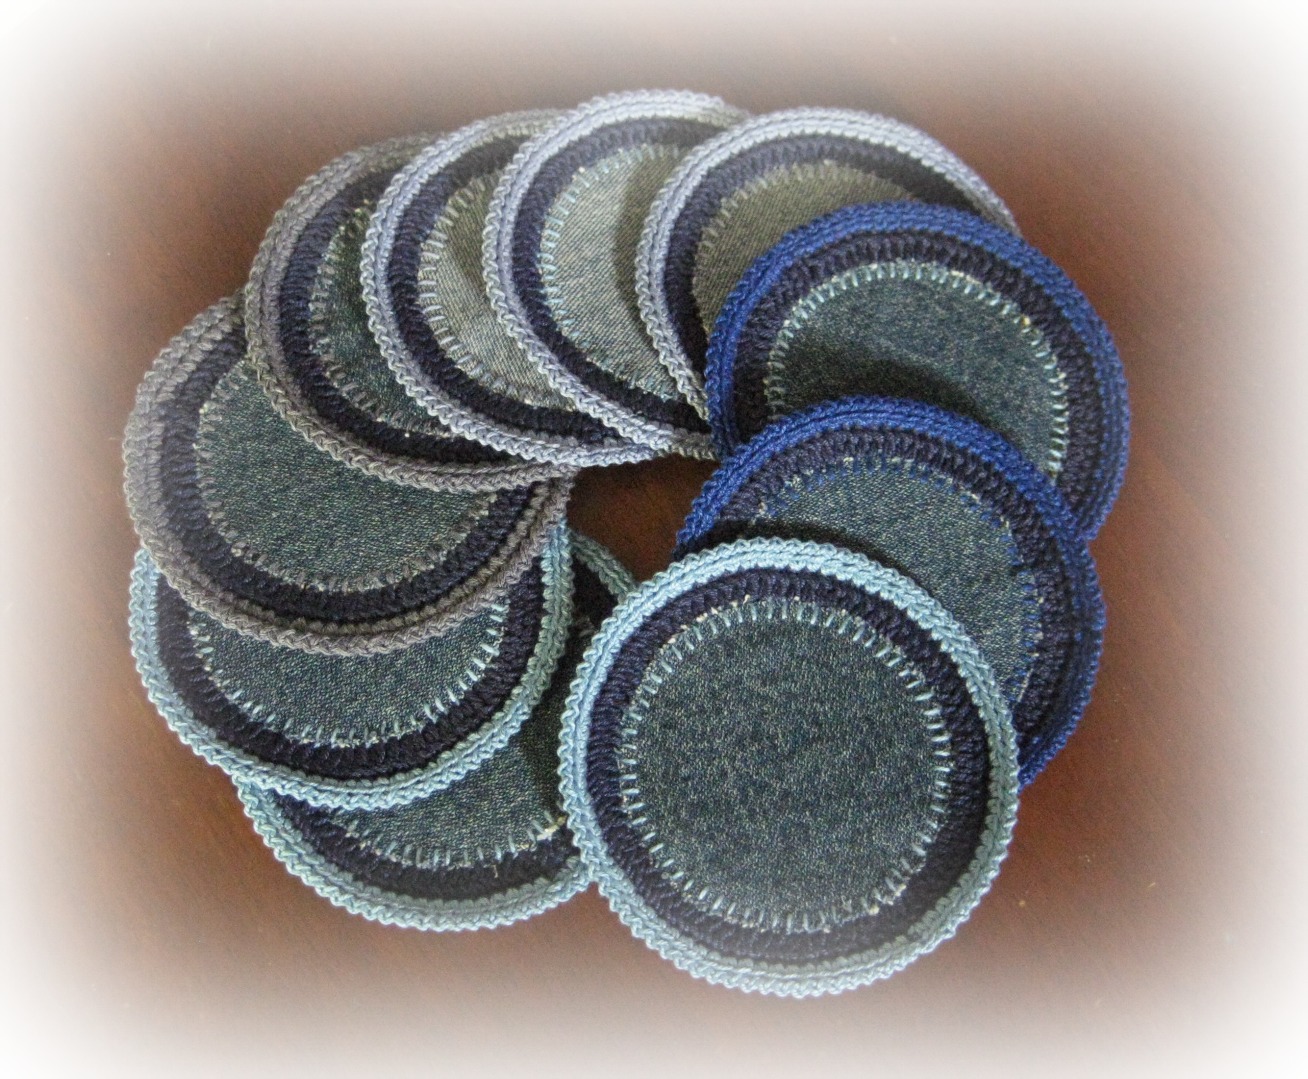
However if the order is for an item I have already made before and especially if its made from my own pattern, I feel confident in doing it. Right now I'm working on an order for recycled denim and crochet coasters. Surprisingly, I find it fun to do this same item many times over ;)
Thanks to the breakfast table for their order of placemats and coasters. They will be opening here in Quezon City in September :)
Here are some of the coasters I finished:


I've also agreed to do another Romantic Shrug for a friend. This time she wants it in red. I think I'm taking too long to finish it, since there's no deadline. 

Romantic Shrug

But now I realize I have to finish this soon. Its time to come up with new designs for next year's crochet ;)


Monday, July 29, 2013

To Iloilo and back home in one day...

Hello...long time no post :p

Several days ago, I took some time out and dropped everything for one day to attend my sister-in-law's funeral in Iloilo. I'm not one to go places by air or water, I sort of have phobias for those kind of trips. But now I felt like I really should go and be with relatives in Iloilo whom I've not seen for many years. Also, I was with my older son who is somewhat of a regular traveler, so I felt confident.
It was quite an experience for me first of all, to board the first early morning flight going there, and the last evening flight going back to Manila. Going there we were late (not my fault) and had to run fast to board the plane :p
It was good to be at the new Iloilo International Airport. I felt like a real tourist ;)

Iloilo International Airport
Upon arrival  we immediately felt at home. Though it was a sad occasion, everyone was happy to see each other since most of us don't normally see each other anymore. Some live abroad and the others outside the province or in Metro Manila.
The funeral rites went on smoothly. There's no band playing (which is common in other provinces). The wake was at their house. The funeral procession began a few blocks from the house to the Catholic church, where a solemn mass was held. They also normally had picture-taking there before proceeding to the cemetery. From the church is another few blocks walk to the cemetery - they chose a nice, quiet place overlooking hills and greenery...
After an early dinner at their house, it was time for us to go :( They drove us to the airport which was a bit of a long ride that I fell asleep :p

Farewell Manang Oliva

Back home, I almost can't believe I rode a plane twice in one day and I'm still feeling fine! I should be sleeping already but I remained sitting on the new sofa I bought a few days before, still in awe over my dream sofa set. It also works like a spa chair for me - quite relaxing and rejuvenating :)
Here's a peek at a fraction of the 5 pc. set. Even though its a bit big for our small house, the pieces could be arranged to fit the space nicely. Will show later after I fix the whole area ;)


Saturday, June 29, 2013

Crochet a Hemp Tote - free pattern


This bag cost only about P80 for the yarn. It is hemp rope made in China and its available in Daiso or Japan Home shops here in Metro Manila. The hemp rope is rather coarse and hard on the hands, but I still like it for its natural qualities ;)

Hemp Tote
by Mimi Alelis

Materials 
Hemp rope, 60m/ball, 3 1/2 balls 
Crochet hook size 4.5mm 
Imitation leather handles 
magnetic snaps, one pair 
yarn needle 
stitch markers 
lining fabric (optional) 
Finished measurement: 15” L x 10” H (when laid flat and unwashed) Note: after washing, it shrank by about 3% and became less stiff. 
Gauge: 15 sts and 7 rows in dc = 4”

Bag
Note: Increase or decrease length, by adding or subtracting from the beginning chain. Increase or decrease height, by adding or subtracting dc rows on the main body. 
Rnd 1: Starting at the bottom, ch 34, sc in 2nd ch from hook and on each ch across, 3 more sc on the last ch, turn to work on opposite side of ch, sc in each ch across, 3 more sc on last ch, join with sl st on the 1st sc of this rnd (note: there are 5 scs in each ch at both ends, the 3 scs in the middle and the succeeding sts thereon will be refered to as the corner; place a marker at the 1st st of each corner and move the marker up as you go) -- 74 sc 
Rnd 2: Ch 1, sc in each sc across, 2 sc in each of the 3 sc at the corner, sc in each sc across, 2 sc in each of the 3 sc at the corner, join with sl st on the 1st sc of this rnd -- 80 sc 
Rnd 3: Ch 1, sc in each sc around with increase at the corners as follows: 2 sc on next sc, sc in next sc, 2 sc in each of the next 2 sc, sc in next sc, 2 sc in next sc; join -- 88 sc 
Rnd 4: Ch 1, sc in each sc around with increase at the corners as follows: 2 sc on next sc, sc in next sc, 2 sc in next sc, sc in next 4 sc, 2 sc in next sc, sc in next sc, 2 sc in next sc; join -- 96 sc 
Rnd 5: Ch 1, sc in each sc around with increase at the corners as follows: 2 sc on next sc, sc in next sc, (2 sc in next sc, sc in next 2 sc) 3 times, 2 sc in next sc, sc in next sc, 2 sc in next sc; join -- 108 sc 
Rnd 6: Ch 3 (counts as dc), dc in each sc around, sl st on top of beg ch 3 to join, turn -- 108 dc 
Rnd 7: (WS) Ch 3, dc in each dc around, sl st on top of beg ch 3, turn -- 108 dc 
Rnds 8 to 19: Repeat rnd 7. (Note: Add more repeat rnds to increase height). 
Rnd 20: (RS) Ch 1, sc in same st, sc in each dc around, sl st on 1st sc to join -- 108 sc 
Rnds 21 to 25: Ch 1, sc in same st, sc in each sc around, sl st on 1st sc to join -- 108 sc 
Edging rnd: Sl st on back loop only of each sc around, join. Fasten off and weave in ends. 

Finishing: Attach or sew handles. Line bag with fabric if desired. Attach magnetic snaps.
Tip: Crochet handles can be made using same yarn. 
Step 1: Measure the length of desired handles. 
Step 2: Make a starting chain in the measured length, less 4 chains. 
Step 3: Follow rounds 1 and 2 of bag. Fasten off.
Step 4: Sew handles in place.


Pattern and photos copyright by Mimi Alelis, 2013


Tuesday, June 11, 2013

My latest published design on Interweave Crochet

Have you seen the projects on Interweave Crochet Summer 2013? Its packed with lots of lace designs and one of it is my own creation, yay! :)

I started to work on this design about two years ago...using size 8 cotton thread, and I wasn't able to finish the sample since it was a bit big and I realized I had to change some design features. I saved it for submission to Interweave.

I guess it really had to be in the summer issue, not just because its lacy, and lightweight...but also because its pretty and relatively simple to make. Only a bit more patience is needed compared to making a lace shawl ;)
Initially I was going to make the sample using Bamboo thread size 10...but I couldn't work as fast with the softer material so I was sent the cotton thread. They chose a nice peach color for the model.

Hibiscus Tunic
Interweave Crochet Summer 2013

This beach cover-up or tunic is made from Aunt Lydia's classic cotton thread, size 10. This can also be made using any brand of size 10 thread (or our local Monaco or Cannon size 8 thread), or any similar thread.
For those who are used to making shawls and a bit intimidated with bigger projects or those with shaping - this might just be the project for you to start making wearables. This is worked straight (with no shaping), and the resulting design includes horizontal mesh bands and vertical rows of small flowers. This is worked continuously from bottom going up, and is split evenly to form the neck opening, then it is joined again at the back and worked straight to the bottom. Only the sides are seamed, and there's no need to crochet edgings, since it is built-in on the main pattern :)

Saturday, May 11, 2013

Summer Crochet

Have you seen the latest crochet patterns for Summer 2013? I browsed the patterns on Ravelry and saw several interesting new designs. I can't wait to see the rest of it ;)
Summer crochet for me is mostly beachwear and accessories. I'm still on the lookout for patterns that I'd like to work on, or designs that I can create myself. There just isn't enough time to do this...but someday I'll come up with my own ultimate summer crochet collection :)
Meanwhile, here are some of my own designs from not so long ago, suitable for summer crochet. As usual, these are made from cotton thread.


Summer Crochet
Summer Crochet
1. Jellyfish Earrings - If you like using beads with crochet, this will be a fun project to make and wear. These earrings can be made as delicate or as funky as you like. Free pattern here on Facebook.
2. Knotted Chain Cowl or HeadbandThe soft fabric allows for it to be knotted, without being too bulky. The knot can be tightened or loosened to adjust fit. Pattern can be purchased here on Ravelry.
3. Pineapple Motif Earrings - This pineapple motif earring is pretty, lightweight, and about the right size at 4 inches high; though you can come up with any size you like with your choice of yarn and hook. More details here.
4. Tropical Shawl with Fringe - A simple mesh pattern make up this shawl, which requires only two balls of cotton thread. Pattern can be found here.
5. Going Around in Circles Scarf - A stylish and lightweight scarf made from one ball of Aunt Lydia's Classic Crochet thread size 10. Pattern can be seen here.
6. Blooming Flower Motif Shrug - A motif shrug for the more adventurous crocheter. Pattern can be purchased here.
7. Simply Striped ShrugA simple pattern design with unique cap-sleeves, makes this shrug a fashionable and practical summer wear. This shrug is crocheted from one sleeve end to the other. No sewing is required. More details here.
8. Stylish Chain ScarfA unique way of using chain loops to build a soft crochet fabric. A bit tricky at first, but you’ll be surprised at how this design works wonderfully. Pattern can be purchased here.
9. Breezy ShrugThis is a simple but nice little project. Crocheted from one sleeve edge to the other and finished off with two rounds of edging on the body. More details here.

More of my designs can be seen on Ravelry. Thank you!


Wednesday, May 01, 2013

Crochet Pattern Updates

Good news for Etsy sellers who sell tutorials and patterns, and for buyers who prefer instant downloads! Sellers can now upload their pdfs to their listings, so customers can download it immediately after purchase.  Wish they had this sooner...but still its wonderful they have it now!

Btw, I'm still working on the pattern for the dress in my previous post...some of you are familiar with the pattern (some already have finished projects), since it became available in print a few years back. I'll be improving the pattern and correct some minor errors... I've changed the neckline for the back part, since a V- neck looks better and is more suitable for warm weather. The finished length is a few inches above the knee, though it can be easily modified by adding/subtracting repeat rows. Stay tuned to my blog for more updates ;)