 |
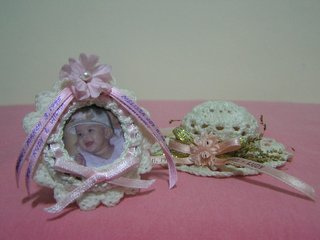
| flower frame souvenir |
Flower Frame Souvenir
Designed by: Mimi Alelis @2002
http://mycrochetstuff.blogspot.com
Note: Pattern and photos are original, all rights reserved by designer.
Materials:
10 gms. cotton or rayon crochet thread, in ecru or other color
1.75mm. steel hook
small length 1/8 " satin ribbon
small flowers for decoration
white glue
Instructions
Frame
Rnd 1: Ch 5, 14 dc in 4th ch from hook (Ch 3 counts as 1st st). Join with sl st on top of ch 3 (15 sts).
Rnd 2: Ch 4, * dc on next dc, ch 1. rep. from * around. Join on ch 3.
Rnd 3: Ch 3, *2 dc in ch-1 space, dc on dc. rep. from * around. Join. (45 sts)
Rnd 4: Ch 1, sc in back loops only on every dc. Join.
Rnd 5: Ch 3, * skip one sc, hdc on next sc, ch 1. rep. from * around. Join on ch 2 of starting ch. fasten off.
Edging: With front facing, join thread on remaining loop of rnd 4. * Ch 3, 2 dc on same st, skip 2 sts, sl st on next st. rep. from * around.
Join (15 shells) Fasten off.
Stand
Row 1: Ch 7, sc in 2nd ch from hook and in each sc across. (6 sc) turn
Row 2: Ch 1, sc in each sc across (6 sc). turn
Row 3: Ch 1, sc in each 2 sc, 1 sc over the next 2 sc (dec), sc in next 2 sc.(5 sc). turn
Row 4 - 5: Ch 1, sc in each sc across. turn.
Row 6: Ch 1, sc in 1st sc, sc over the next 2 sc (dec), sc in each of next 2 sc. (4sc) turn
Row 7 - 8: Ch 1, sc in each sc across. turn.
Row 9: Ch 1, sc in 1st sc, sc over the next 2 sc (dec), sc in last sc (3 sc). turn.
Row 10: Ch 1, sc in each sc across. Fasten off leaving an 8" length for sewing.
Finishing
Sew the stand at the back of frame. Stiffen the frame with white glue mixed with equal amount of water. Do not put stiffener on round 5 of frame. Leave to dry and shape as necessary. Dry completely. Weave a 1/8" ribbon on round 5.
Tie to a bow and trim ends. Decorate with flowers.
 |
| hat souvenir |
http://mycrochetstuff.blogspot.com
Note: Pattern and photos are original, all rights reserved by designer.
Materials:
10 gms. cotton or rayon crochet thread, in ecru or other color
1.75mm. steel hook
small length 1/8 " satin ribbon
small flowers for decoration
white glue
Instructions
Starting at the top, ch 4
Rnd 1: 14 dc in 4th ch from hook, sl st on starting ch.
Rnd 2: ch 4, *dc in next dc, ch 1; rep. from * around, ending w/ ch 1, sl st in 3rd st of ch 4 (15 sps)
Rnd 3: ch 3, * 2 dc in next sp, dc in next dc, rep. from * around, ending with 2 dc in last sp. sl st on top st of ch 3. (45 dc)
Rnd 4: ch 1, sc in same space. * ch 3, skip 2 sc, sc in next sc; rep. from * around. join
Rnd 5: sl st in ch 3 sp. ch 1, * sc in same space, 3 dc in next sc, sc in next space, ch 3; rep. from * around. join.
Rnd 6: sl st to 2nd dc. ch 1, sc in same space, * ch 3, sc on ch 3 loop, ch 3 sc on 2nd dc; rep. from * around. join.
Rnd 7: ch 1, sc in same space *2 sc in ch 3 space, sc on sc, rep. from * around. join.
Rnd 8: ch 3, *skip 1 sc, hdc on next sc, ch 1; rep. from * around. join on ch 2 of starting ch.
Rnd 9: ch 1, sc in same space. ch 5, skip 1 sp and 1 hdc, sc on next sp, * ch 5, skip 2 hdc, sc on next sp; rep. from * around. join.
Rnd 10: ch 1, sc in same loop, * sc on next loop, 5 dc on next sc, sc on next loop, ch 5; rep. from * around ending with sc on last loop, ch 5, join.
Rnd 11: Sl st to the 3rd dc, ch 1, sc on same space, * ch 7, sc on next loop, ch 7, sc on 3rd dc of next shell; rep. from *around. ch 3, tr on starting sc.
Rnd 12: ch 1, sc in same space. * ch 7, sc on next loop, 5 dc in next sc, sc on next loop, rep. from * around ending with ch 7, sc in next loop. join.
Fasten off. Weave in ends with needle.
Finishing Stiffen wtih white glue mixed with equal amount of water. Shape and mold as necessary. Dry completely. Weave a 1/8" ribbon about 15" long on round 8. Tie to a bow and trim ends. decorate with flowers.
 |
| beaded scrunchie |
Beaded Scrunchie
Designed and copyrighted by: Mimi Alelis @2005
http://mycrochetstuff.blogspot.com
Note: Pattern and photos are original, all rights reserved by designer.
Materials:
1 ball crochet cotton (Cannon crochet cotton used in sample)
22 beads of your choice
Size 6/0 crochet hook (3.50mm)
Ponytail elastic
Yarn needle for finishing
Instructions:
Work with two strands of thread held together.
First string the beads onto the thread before starting to crochet. (I use white glue to stiffen the end of the threads to easily string the beads.

Knot the thread on the elastic
Rnd 1: Single crochet around elastic (44 sc). Sl st on 1st sc to join.
Rnd 2: Ch 4, (dc in next sc, ch 1) repeat around. Sl st on 3rd ch of beg. ch 4
Rnd 3: Sl st in 1st ch 1 space. (2dc, ch1, 2dc,ch 1 in same space. In the next ch 1 space, 3dc, ch1, take up one bead, ch 1, 3dc, ch1) repeat around. Sl st on beg. dc. Fasten off. Weave in ends with yarn needle.
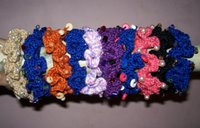
More photos of beaded scrunchies here and here.
Fur scrunchies - photos and tips on making these.
All my designs in one page - thanks to Ravelry!
Appliques for Baby Items
Designed and copyrighted by: Mimi Alelis @2005
http://mycrochetstuff.blogspot.com
Note: Pattern and photos are original, all rights reserved by designer.
Materials: Cotton thread, small amounts
Size 2 or 1.75mm steel hook
Flower : With white (contrasting color) , ch 2, 6 sc in 2nd ch from hook. Join with sl st to first sc. Change to pink (main color), [ (ch 2, 3dc, ch 2, sl st) in the same sc, sl st to the next sc], 6 times, making 6 petals.
Star : With any color, ch 2, 5 sc in 2nd ch from hook. Join with sl st to first sc.
[ (ch 2, dc, ch 2, sl st in 2nd ch from hook, dc, hdc, ch 1, sl st) in the same sc, sl st to the next sc], 5 times, making 5 points. (Note: this applique is reversible.)
Butterfly : With dk color (for body), ch 8, sl st on 2nd ch from hook, sc in the next 5 ch, 3 sc and sl st on the last ch. Fasten off.
Attach light color (for wings)on the 2nd sc from tail end, [(ch 2, dc, 2 tr, ch 3, sl st) in the same sc], skip 1 sc, sl st on the next sc, repeat [ ].
Ch 2, passing under the body, sl st on the opposite edge of the 2nd wing made, [(ch2, dc, 2 tr, ch 3, sl st) in same stitch], skip 1 stitch, sl st on the next stitch. repeat [ ]. Fasten off.
Balloons : With any color, leaving a 6” tail for sewing, ch 2, 5 sc in 2nd ch from hook. Do not join, work continuously around: 2 sc in next 6 sc, sc in next sc, 2 sc in next sc, sc in the next sc, sc and hdc in the next sc, sl st in next sc. Ch 1, turn, sl st on the next st. Ch 7, or more for the string. Fasten off.
Mitten pattern is here. All my designs in one page - thanks to Ravelry!
I remember these! :) I might just make the souvenior picture frame; I have been looking for a baby picture frame, for a gift; but haven't been able to find one. My Aunt taught me how to make picture frames (and photo albums) out of fabric, back when I was a teenager. I haven't made one in years, though.
ReplyDeleteHi Tina, I think a fabric picture frame is a good idea, I made scrap denim picture frames as christening souvenir and they liked it ;)
Delete