Showing posts with label cotton thread. Show all posts

Monday, July 21, 2025

Crochet doll for my granddaughter

Hello, welcome back to my blog! ...you may also want to view my blog archive (at the right side of this page) to see my past original posts, full of useful information and inspiration for my fellow crocheters. 

For this post I'm happy to share my very first all-crochet cotton doll. I used our locally available 100% cotton mercerized crochet thread. I used double strand, to substitute for the fingering weight cotton yarn used in the pattern.

I bought the pattern at crochetree.com  I'm not affiliated with the site, I only want to share my appreciation for the well-written patterns of  the designer. 

This project took me about 5 weeks, since I crochet only a few hours a day. It really requires a lot of patience, but it is very doable for crocheters just by following the pattern instructions.


Here are some of my progress pics...


I modified the pattern a bit, especially for the dress and the bag...but overall, it pretty much looks like the model of the designer, here are the pics side by side. My work is the one on the right, with the yellow bag.


My granddaughter loved this doll I made for her.


Thursday, August 27, 2020

Back to Crochet and Crafting...


With all the initial stress of this pandemic, I didn't feel like crafting for a while. Until recently, that is. Now I feel I'm back to my crochet and crafting mojo! 
First I decided to finish this ancient project of mine, started in 2011. This was the prototype of my design published on Interweave Crochet Summer 2013. The pattern is available here.

A beach-ready outfit waiting for the opportunity.


Next, my newest crochet/sewing project...its granny squares and recycled denim! First time I enjoyed making granny squares! 
This started as a wearable project for a child, based on this pattern ...thinking it would be for my granddaughter. But having made the squares using local size 8 threads, I realized its not going to be comfy to wear in our warm weather, its also a bit scratchy on the skin, and most of all will take too much time. 
Now, as I admire the squares I made so far, I thought of what I could make with it. I imagined a bag, a child's bag...and its going to be combined with denim for that modern, and edgy vibes.


And now, its finished! I like it a lot...will my granddaughter like it too? I'll save it for her next birthday.


I'm currently working on two crochet thread projects. One of which I intend to submit as a design proposal...I need to work faster now as the deadline is near. 

Thanks for looking, and please keep on following my posts...I will try not to disappoint 😀
You can also follow me on IG at crochet.denim.me and on FB at Mimi Alelis Designs.

Sunday, April 28, 2019

The Little Mermaid Crochet

My granddaughter likes Disney Movies. She loves to sing the theme songs, dress up in Princess costumes and play with character dolls. So I wanted to surprise her - I planned to make some dolls and other characters in the Disney movies...and this is the first one I finished:

Little Mermaid Crochet
Based mainly on this pattern. This is made from cotton thread using 1.75mm hook...so it took a while to finish. My granddaughter got excited when she saw it for the first time. I also finished a Flounder amigurumi and have yet to surprise her with it...

Flounder Amigurumi

Free crochet pattern for Flounder, now published here.

Saturday, April 27, 2019

Summer Crochet

Here in Quezon City, summer heat is almost unbearable...as a crocheter I produce the least amount of projects at this time and only focus on necessary and enjoyable projects...such as my recently finished Ariel Mermaid Doll and Flounder Amigurumi for my granddaughter...(more on that on my next post).

Summer also makes me obsess over crochet lace garments! I have one I need to finish and luckily I have one already in my wardrobe...these kind of crochet never goes out of style - like this cover-up I made 13 years ago, and its still good as new.

crochet beach cover-up
crochet cover-up
So here I found reason to try out my new swimsuit, use the tripod, and take pics of myself wearing my crochet cover-up...then simply edited the pics on the Photo Lab app on my phone. It was fun!

Monday, March 25, 2019

Crochet Stuff in 2018

Happy 2019! March is almost over, but again its better late than never - here is my round-up of craftiness in the previous year...with the hopes of continued crafting this year. I know I won't crochet much, since I'd like to focus on health and fitness (activities that get us out of our comfy chair is much better), though there are so many cute crochet stuff I plan to make for my grandchildren.
Meanwhile, please take a look at what I did in 2018.

Crochet Patterns

I was able to add 2 free crochet patterns here in my blog, and one published design in 2018:


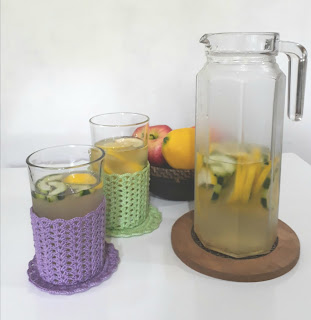
Glass Holder and Coaster Set - made from size 8 cotton thread.


And...my latest and favorite published pattern ever (since it appeared on the cover) is my lace crochet yoke top, published as Yesteryear Top in Interweave Crochet Summer 2018.


Projects

I finished only about 17 crochet projects in 2018... mostly small projects, including amigurumi toys and animal appliques.
Some of my favorite projects are these food amigurumi and animal appliques for my granddaughter and kid nephews.


My favorite projects from last year are the Lion and Hippo heads Handpuppets...which I made up the design as I crocheted it. I based it from the images in the cartoon movie "Lion of Madagascar"...inspired by my granddaughter's love of the characters. I have yet to make the giraffe and the zebra (or not...) This took up a lot of my time, but it was worth it to see how much my son and granddaughter loved playing with it.


Another crafty year ahead, beginning with this dreamcatcher I made in January for a friend visiting from abroad.


Thanks for looking! Hope to have you here again in my next post. 


Saturday, March 10, 2018

Glass Holder and Coaster Set - free crochet pattern

crochet glass holder and coaster
Glass holder and coaster set

Glass Holder and Coaster
copyright Mimi Alelis, 2018
This pattern can only be found on this link:
http://mycrochetstuff.blogspot.com/2018/03/glass-holder-and-coaster-set-free.html

Materials
Cannon cotton thread, size 8 (can be substituted with size 10 thread), one ball, 50gm (note: one ball will make 2 sets of glass holder and coaster in this pattern)
Crochet hook size 1.75mm
Yarn needle to weave in ends
Finished size: Glass holder: about 4 inches across top, and 4 inches in height, measured flat; Coaster is about 4 inches in diameter

Glass holder
Note: Ch 3 at the beginning of rnds counts as dc.
Start with magic ring, (or, ch 4, sl st in 1st ch to form a ring),
Rnd 1: Ch 3, 14 dc in ring, join with sl st to beginning ch 3. (15 dc)
Rnd 2: Ch 3, dc in same st, 2 dc in each dc around, join. (30 dc)
Rnd 3: Ch 4 (counts as dc and ch 1), dc in next dc, (ch 1, dc in next dc) repeat around, join. (30 dc with ch-1 space in-between)
Rnd 4: Sl st in next ch-1 space, ch 3, dc in same sp, 2 dc in each ch-1 sp around, join. (60 dc)
Rnd 5: Ch 3, dc in same st, ch 2, 2 dc in same st (shell made), [skip 3 dc, (2 dc, ch 2, 2 dc) in next dc] repeat around, join. (15 shells)
Rnd 6-15: Sl st in ch-2 sp, ch 3, dc in same sp, ch 2, 2 dc in same sp, (2 dc, ch 2, 2 dc) in each ch-2 sp around, join. (15 shells)
Rnd 16: Ch 1, (5 sc in ch-2 sp of shell, sc in space between shells) repeat around, join with sl st in 1st sc.
Fasten off and weave in ends.

Coaster
Note: Ch 3 at the beginning of rnds counts as dc.
Start with magic ring, (or, ch 4, sl st in 1st ch to form a ring),
Rnd 1: Ch 3, 14 dc in ring, join with sl st to beginning ch 3. (15 dc)
Rnd 2: Ch 3, dc in same st, 2 dc in each dc around, join. (30 dc)
Rnd 3: Ch 3, 2 dc in next dc, (dc in next dc, 2 dc in next dc) repeat around, join. (45 dc)
Rnd 4: Ch 3, dc in next dc, 2 dc in next, (dc in next 2 dc, 2 dc in next dc) repeat around, join. (60 dc)
Rnd 5: Ch 3, dc in next 4 dc, 2 dc in next, (dc in next 5 dc, 2 dc in next dc) repeat around, join. (70 dc)
Rnd 6: Ch 3, dc in next 5 dc, 2 dc in next, (dc in next 6 dc, 2 dc in next dc) repeat around, join. (80 dc)
Rnd 7: Ch 3, dc in same st, ch 2, 2 dc in same st (shell made), [skip 3 dc, (2 dc, ch 2, 2 dc) in next dc] repeat around, join. (20 shells)
Rnd 8: Ch 1, (5 sc in ch-2 sp of shell, sc in space between shells) repeat around, join with sl st in 1st sc.
Fasten off and weave in ends.
Note: the coaster will normally curl up like this:


It is easy to flatten, just dampen (or spray with a little water) and press.


Friday, August 11, 2017

Going Around in Circles Bracelet - free crochet pattern


Going Around in Circles Bracelet

A stylish design for use with variegated or multicolored threads or yarn.  Any thread or yarn will do, using the appropriate size of hook.

Materials: Size 10 thread and size 1.5mm hook
Finished size: approximately 6 inches

Note: Circles are crocheted in a spiral, and worked one after another. Do not join rounds and do not cut off thread, unless specified.

Bracelet
Leave about 8 inches tail at the beginning, to be used for sewing button later.
First circle
Rnd 1: Ch 2, 8 sc in 2nd ch from hook, do not join but continue to the next rnd. (8 sc)
Rnd 2: 2 sc in each sc around, sl st on next st. (16 sc) Continue on to
Big circle
Rnd 1: Ch 6, 8 sc in 2nd ch from hook. (8 sc)
Rnd 2: 2 sc in each sc around. (16 sc)
Rnd 3: (Sc in next sc, 2 sc in next) repeat 4 times, with right side facing, sl st on the same st as the last st of previous circle, (sc in next sc, 2 sc in next) repeat 4 times, sl st on the next st. (24 sc)
Small circle
Rnd 1: Ch 5, 8 sc in 2nd ch from hook. (8 sc)
Rnd 2: 2 sc in each of the next 4 sc, sl st on the same st as the last st of previous circle, 2 sc in each of the next 4 sc, sl st on next st. (16 sc)
Continue making circles, alternating big and small, until you have 12 circles or until desired length.
Loop for button closure: Ch 12, sl st back to the base of the ch, sl st in each ch around. (Check to see if loop fits the button). Fasten off and weave in end.
Sew the button on the first circle.


Thursday, June 29, 2017

Crochet Makeover Flip-flops tutorial

Crochet makeover flip flops


How to prepare the slipper for crochet is demonstrated in my video on YouTube, please view here.


Materials:
Pair of rubber flipflops or sandals
Crochet thread, for the sole edge, I used cotton thread size 10 for the edging; Catania cotton sportweight yarn for the strap
Crochet hook size 1.5mm and 3mm
Yarn needles for thread and for yarn
Hot-melt glue gun, or fabric glue


(Pattern for the strap is derived from my previous pattern found here.)

Instructions for crochet strap (for this makeover project):
Note: Work sl sts in back loop only.
Using sportweight yarn and 3mm hook, leave at least 6 inches tail at the beginning, ch 66,
Row 1: Sl st in 2nd ch from hook and on the next 7 chs, sc in the next 24 chs, 3 sc in the next ch (place marker in the middle st of the last 3 sc, move the marker up as you go), sc in next 24 chs, sl st in the last 8 chs, turn.
Row 2: Sl st in the first 8 sts, sc in the next 25 sc, 3 sc in the st where marker is placed, sc in the next 25 sc, sl st in the last 8 sts, turn.
Row 3Sl st in the first 8 sts, sc in the next 26 sc, 3 sc in the st where marker is placed, sc in the next 26 sc, sl st in the last 8 sts, turn.
Row 4: Sl st in the first 8 sts, sl st in both loops of each sc across, sl st in back loops of last 8 sts, turn.
Row 5: Work 2 sl st at the end of row to get to the opposite edge, sl st in each st across. Fasten off.


crocheted strap


Assembly:
Secure the middle of the crochet piece by sewing around the center joint of the flipflop strap. Do the same with the ends of the straps using the tail ends of the crochet. Apply glue on the top of the flip flop straps and position the crochet piece. 

Monday, January 09, 2017

Crochet Stuff in 2016


Hello! Another year has passed....and as usual I blog about the past year's projects...even though there wasn't much :p I'm thankful there's Ravelry and Instagram, where I can post projects as they happen and review them anytime ;)

So here goes a summary of my crochet in 2016 -

The only original pattern I was able to share is the Open Weave Rattan Stitch Poncho. Since I had promised to make one each for a group of friends, it became my major project for the past year (that extended a bit this year...).

crochet pattern
Rattan-stitch Poncho

Next on my list, is my most memorable design - made in 2015, but came out and got published in 2016. Its called Limpet Lace Top and its featured in Interweave Crochet Summer 2016.

Mimi Alelis
Limpet Lace Top
On other crafting projects - these recycled denim placemats and coasters for Papa Diddi's ice cream restaurant. I enjoyed making these :)


Next is my favorite crochet project - the mini Hobbes amigurumi for my son, based on a free pattern by miahandcrafter. I wasn't able to take the actual measurement, but I estimate it at 5" tall.

Mini Hobbes
I also made several baby booties since I got excited for the arrival of my first grandchild last July and the birth of more babies in our clan.


Lastly, and this is also one of my favorite project - a crochet scarf for Jackie Lou Blanco. She liked a scarf I posted on IG, and inquired on how to order one. I took it as an opportunity to make her one as a fan gift, since I believe she's one of our best actress of all time, and I'd love to see a celebrity wear my creation :)


Happy New Year!!
Me and my sister-in-law

Thursday, June 02, 2016

My design in Interweave Crochet Summer 2016!!!

Hello, pardon my excitement...I have a design in the latest issue of Interweave Crochet! Yay! Go see it, go get a copy now!...Take a look at the lovely patterns of the Summer issue here on Ravelry, or here on the Interweave site.

And here's my very own top-down construction pullover, cap-sleeve top, made using size 10 cotton thread. Here is a photo of my design featured on the contents page! [photo credit: Interweave/Harper Point Photography]

Limpet Lace Top
If you are thinking of making this...here are some notes I can share.
I don't know if there will be other minor issues, but I see that my finished size, and gauge numbers had been edited a bit. I think the difference lies in the kind of hook used and not blocking the fabric before measuring. The stitch pattern is stretchy and the finished top is meant to be worn with 2-4" negative ease.
Because of the nature of the design, the yoke is the same for the first three sizes, and the same but bigger (with two more pineapples), for the last two sizes as written in the pattern.
The yoke is very pretty! Working on it is both enjoyable and challenging because every round is different. (I really found it hard to take breaks while making this, it is so engaging.)

Here's my original pattern notes and gauge swatch:

Finished Size: 30 ½  (32 ½ , 34 ½ , 37, 39 ½ )” to fit bust sizes up to 32 (34, 36, 39, 42)”; Finished length 25”. Sample made in size 32 ½ .

Yarn: Coats and Clark Aunt Lydia’s crochet thread Classic 10 (100% Mercerized cotton; 350 yd [320 m]; # [antique white], 4 (4, 5, 6, 7) balls.
Hook: size B (2.2mm). Adjust hook size if necessary to obtain correct gauge.
Notions: Stitch markers (m); yarn needle.
Gauge: 34 sts and 15 rows = 4” in main pattern stitch

Notes
Construction starts with a bruges lace neck band, onto the lace yoke worked continuously in joined rounds, then separated into front and back at the chest, then worked in joined rnds from the underarm. Main body shaping and length can be custom-fit, up to bottom lace section. Bottom lace pattern repeats every 30 sts.
Ch 3 at the beg of each rnd/row, counts as dc, ch 4 at the beg of rnd counts as tr.


Stitch Guide
dc2tog: Double crochet 2 together—[Yarn over, insert hook in next st and draw up a loop, yo and draw through 2 lps] twice, yo and draw through 3 lps on hook.
dc3tog: Double crochet 3 together—[Yarn over, insert hook in next st and draw up a loop, yo and draw through 2 lps] 3x, yo and draw through 4 lps on hook.

Gauge Swatch
Row 1: (RS) Ch 42, dc in 4th ch from hook and on each ch across, turn. (40 dc)
Row 2: Ch 3, working in front loops only, dc in each dc across, turn.
Rows 3 to 16: Rep row 2. 
Fasten off, block and measure.


Additional Notes:

The lace yoke part is about 5 inches from neck edge to the beginning of the solid stitch part.
Here's my test project for the bigger-size range (the last two sizes in the pattern). The yoke is 2 pineapple patterns more than the yoke for the first three sizes in the pattern.


The yoke is quite stretchy too...and the last two sizes in the pattern will be quite huge compared to the sample project in the magazine, which is the second size in the pattern. The dressform here is a size 34" bust, and the project comes to approx. 37" at the bust (unstretched).

Crochet test project, lace yoke


By the way, here's the first sample I made, shown here as my design proposal submitted to Interweave. Its closest to the first size in the pattern. Worn here with 1 1/2" negative ease.

Lace yoke top
Lace-yoke Top


Please let me know if you have a question or comment about this design. I'll be adding notes here as needed for clarification.


Tuesday, January 06, 2015

Crochet and Other Stuff in 2014

Patterns
Only a few to list down...when it comes to writing crochet patterns and publishing it, though this coming year looks promising :)

Here are three designs that got published in 2014:

1. Pinwheel Flower - free pattern here in my blog.
2. Sienna Top - published in the book It Girl Crochet by Interweave Press. 
3. Pinya Glass Cozy - a free pattern published here.

Projects
Started with 554 projects and added 28 for a total of 582...(my Ravelry projects)
Some of my favorite projects are those for the babies in my extended family -


Another favorite of mine is the irish crochet motifs I made to be framed and hung in my workspace.


Yarns
There are now even more choices and more opportunities to buy yarns. One of which is having a crafty friend in another country, where quality yarns are available...and affordable too ;) Our Cebuana friend, Fe of Knitwerks and Crafts Boutique, retails yarns she buys mostly in Singapore.
Here's a recent purchase from Fe:


I even got more of the cotton yarns, since the colors are so nice and the yarn is smooth and would be a good choice for amigurumi toys and other accessories.

I also decided to order a bit from a big yarn company, Bergere de France, just for the experience. I love their yarns, patterns and customer service. I might order again, but need to order more yarns to maximize on the shipping cost...However, I'm reluctant to order more than $50. worth of items...for I have yet to ascertain if I will be taxed heavily upon customs inspection at the P.O.

Bergere order
Bergere de France

Other Crafts 
I love sewing too...some simple wardrobe repair or upcycling here and there. No serious sewing yet, though I was able to make some recycled denim stuff, including denim star ornaments and reordered denim placemats for The Breakfast Table; and denim picture-frame souvenirs for my nephew's Christening.


My Working Space
I've completed my working space - thanks to the Surplus shop nearby. I kept on checking their items for several months until I got the big, and spacious shelves...
Most of what I have here I had for several years already...Again I thank my sis-in-law for the sewing machine, my brother for the working table, and my son for my computer and the size small dressform :)


More patterns and projects in the coming year, I guess ;)
Thanks for looking! And by the way, there's this blog featuring each week an interview with knit and crochet designers from around the world. I got included and you can find the article here.