Showing posts with label thread crochet. Show all posts

Thursday, August 27, 2020

Back to Crochet and Crafting...


With all the initial stress of this pandemic, I didn't feel like crafting for a while. Until recently, that is. Now I feel I'm back to my crochet and crafting mojo! 
First I decided to finish this ancient project of mine, started in 2011. This was the prototype of my design published on Interweave Crochet Summer 2013. The pattern is available here.

A beach-ready outfit waiting for the opportunity.


Next, my newest crochet/sewing project...its granny squares and recycled denim! First time I enjoyed making granny squares! 
This started as a wearable project for a child, based on this pattern ...thinking it would be for my granddaughter. But having made the squares using local size 8 threads, I realized its not going to be comfy to wear in our warm weather, its also a bit scratchy on the skin, and most of all will take too much time. 
Now, as I admire the squares I made so far, I thought of what I could make with it. I imagined a bag, a child's bag...and its going to be combined with denim for that modern, and edgy vibes.


And now, its finished! I like it a lot...will my granddaughter like it too? I'll save it for her next birthday.


I'm currently working on two crochet thread projects. One of which I intend to submit as a design proposal...I need to work faster now as the deadline is near. 

Thanks for looking, and please keep on following my posts...I will try not to disappoint 😀
You can also follow me on IG at crochet.denim.me and on FB at Mimi Alelis Designs.

Saturday, April 27, 2019

Summer Crochet

Here in Quezon City, summer heat is almost unbearable...as a crocheter I produce the least amount of projects at this time and only focus on necessary and enjoyable projects...such as my recently finished Ariel Mermaid Doll and Flounder Amigurumi for my granddaughter...(more on that on my next post).

Summer also makes me obsess over crochet lace garments! I have one I need to finish and luckily I have one already in my wardrobe...these kind of crochet never goes out of style - like this cover-up I made 13 years ago, and its still good as new.

crochet beach cover-up
crochet cover-up
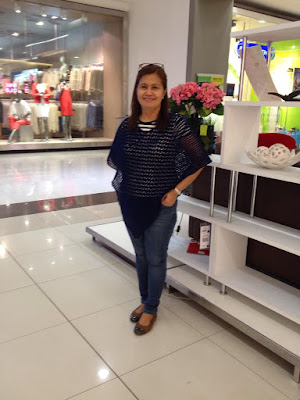
So here I found reason to try out my new swimsuit, use the tripod, and take pics of myself wearing my crochet cover-up...then simply edited the pics on the Photo Lab app on my phone. It was fun!

Saturday, March 10, 2018

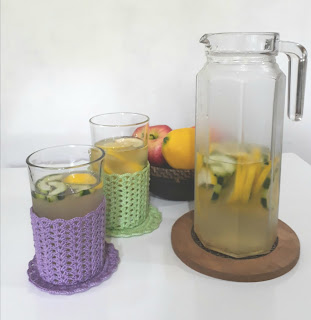
Glass Holder and Coaster Set - free crochet pattern

crochet glass holder and coaster
Glass holder and coaster set

Glass Holder and Coaster
copyright Mimi Alelis, 2018
This pattern can only be found on this link:
http://mycrochetstuff.blogspot.com/2018/03/glass-holder-and-coaster-set-free.html

Materials
Cannon cotton thread, size 8 (can be substituted with size 10 thread), one ball, 50gm (note: one ball will make 2 sets of glass holder and coaster in this pattern)
Crochet hook size 1.75mm
Yarn needle to weave in ends
Finished size: Glass holder: about 4 inches across top, and 4 inches in height, measured flat; Coaster is about 4 inches in diameter

Glass holder
Note: Ch 3 at the beginning of rnds counts as dc.
Start with magic ring, (or, ch 4, sl st in 1st ch to form a ring),
Rnd 1: Ch 3, 14 dc in ring, join with sl st to beginning ch 3. (15 dc)
Rnd 2: Ch 3, dc in same st, 2 dc in each dc around, join. (30 dc)
Rnd 3: Ch 4 (counts as dc and ch 1), dc in next dc, (ch 1, dc in next dc) repeat around, join. (30 dc with ch-1 space in-between)
Rnd 4: Sl st in next ch-1 space, ch 3, dc in same sp, 2 dc in each ch-1 sp around, join. (60 dc)
Rnd 5: Ch 3, dc in same st, ch 2, 2 dc in same st (shell made), [skip 3 dc, (2 dc, ch 2, 2 dc) in next dc] repeat around, join. (15 shells)
Rnd 6-15: Sl st in ch-2 sp, ch 3, dc in same sp, ch 2, 2 dc in same sp, (2 dc, ch 2, 2 dc) in each ch-2 sp around, join. (15 shells)
Rnd 16: Ch 1, Ch 1, (5 sc in ch-2 sp of shell, sc in space between shells) repeat around, join with sl st in 1st sc.
Fasten off and weave in ends.

Coaster
Note: Ch 3 at the beginning of rnds counts as dc.
Start with magic ring, (or, ch 4, sl st in 1st ch to form a ring),
Rnd 1: Ch 3, 14 dc in ring, join with sl st to beginning ch 3. (15 dc)
Rnd 2: Ch 3, dc in same st, 2 dc in each dc around, join. (30 dc)
Rnd 3: Ch 3, 2 dc in next dc, (dc in next dc, 2 dc in next dc) repeat around, join. (45 dc)
Rnd 4: Ch 3, dc in next dc, 2 dc in next, (dc in next 2 dc, 2 dc in next dc) repeat around, join. (60 dc)
Rnd 5: Ch 3, dc in next 4 dc, 2 dc in next, (dc in next 5 dc, 2 dc in next dc) repeat around, join. (70 dc)
Rnd 6: Ch 3, dc in next 5 dc, 2 dc in next, (dc in next 6 dc, 2 dc in next dc) repeat around, join. (80 dc)
Rnd 7: Ch 3, dc in same st, ch 2, 2 dc in same st (shell made), [skip 3 dc, (2 dc, ch 2, 2 dc) in next dc] repeat around, join. (20 shells)
Rnd 8: Ch 1, (5 sc in ch-2 sp of shell, sc in space between shells) repeat around, join with sl st in 1st sc.
Fasten off and weave in ends.
Note: the coaster will normally curl up like this:


It is easy to flatten, just dampen (or spray with a little water) and press.


Monday, January 09, 2017

Crochet Stuff in 2016


Hello! Another year has passed....and as usual I blog about the past year's projects...even though there wasn't much :p I'm thankful there's Ravelry and Instagram, where I can post projects as they happen and review them anytime ;)

So here goes a summary of my crochet in 2016 -

The only original pattern I was able to share is the Open Weave Rattan Stitch Poncho. Since I had promised to make one each for a group of friends, it became my major project for the past year (that extended a bit this year...).

crochet pattern
Rattan-stitch Poncho

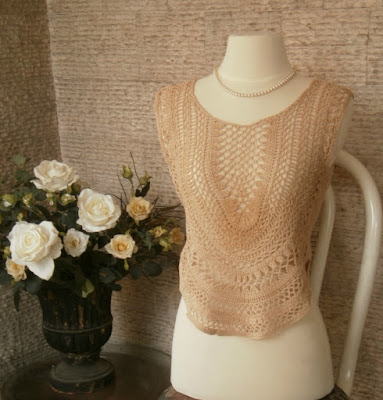
Next on my list, is my most memorable design - made in 2015, but came out and got published in 2016. Its called Limpet Lace Top and its featured in Interweave Crochet Summer 2016.

Mimi Alelis
Limpet Lace Top
On other crafting projects - these recycled denim placemats and coasters for Papa Diddi's ice cream restaurant. I enjoyed making these :)


Next is my favorite crochet project - the mini Hobbes amigurumi for my son, based on a free pattern by miahandcrafter. I wasn't able to take the actual measurement, but I estimate it at 5" tall.

Mini Hobbes
I also made several baby booties since I got excited for the arrival of my first grandchild last July and the birth of more babies in our clan.


Lastly, and this is also one of my favorite project - a crochet scarf for Jackie Lou Blanco. She liked a scarf I posted on IG, and inquired on how to order one. I took it as an opportunity to make her one as a fan gift, since I believe she's one of our best actress of all time, and I'd love to see a celebrity wear my creation :)


Happy New Year!!
Me and my sister-in-law

Thursday, June 02, 2016

My design in Interweave Crochet Summer 2016!!!

Hello, pardon my excitement...I have a design in the latest issue of Interweave Crochet! Yay! Go see it, go get a copy now!...Take a look at the lovely patterns of the Summer issue here on Ravelry, or here on the Interweave site.

And here's my very own top-down construction pullover, cap-sleeve top, made using size 10 cotton thread. Here is a photo of my design featured on the contents page! [photo credit: Interweave/Harper Point Photography]

Limpet Lace Top
If you are thinking of making this...here are some notes I can share.
I don't know if there will be other minor issues, but I see that my finished size, and gauge numbers had been edited a bit. I think the difference lies in the kind of hook used and not blocking the fabric before measuring. The stitch pattern is stretchy and the finished top is meant to be worn with 2-4" negative ease.
Because of the nature of the design, the yoke is the same for the first three sizes, and the same but bigger (with two more pineapples), for the last two sizes as written in the pattern.
The yoke is very pretty! Working on it is both enjoyable and challenging because every round is different. (I really found it hard to take breaks while making this, it is so engaging.)

Here's my original pattern notes and gauge swatch:

Finished Size: 30 ½  (32 ½ , 34 ½ , 37, 39 ½ )” to fit bust sizes up to 32 (34, 36, 39, 42)”; Finished length 25”. Sample made in size 32 ½ .

Yarn: Coats and Clark Aunt Lydia’s crochet thread Classic 10 (100% Mercerized cotton; 350 yd [320 m]; # [antique white], 4 (4, 5, 6, 7) balls.
Hook: size B (2.2mm). Adjust hook size if necessary to obtain correct gauge.
Notions: Stitch markers (m); yarn needle.
Gauge: 34 sts and 15 rows = 4” in main pattern stitch

Notes
Construction starts with a bruges lace neck band, onto the lace yoke worked continuously in joined rounds, then separated into front and back at the chest, then worked in joined rnds from the underarm. Main body shaping and length can be custom-fit, up to bottom lace section. Bottom lace pattern repeats every 30 sts.
Ch 3 at the beg of each rnd/row, counts as dc, ch 4 at the beg of rnd counts as tr.


Stitch Guide
dc2tog: Double crochet 2 together—[Yarn over, insert hook in next st and draw up a loop, yo and draw through 2 lps] twice, yo and draw through 3 lps on hook.
dc3tog: Double crochet 3 together—[Yarn over, insert hook in next st and draw up a loop, yo and draw through 2 lps] 3x, yo and draw through 4 lps on hook.

Gauge Swatch
Row 1: (RS) Ch 42, dc in 4th ch from hook and on each ch across, turn. (40 dc)
Row 2: Ch 3, working in front loops only, dc in each dc across, turn.
Rows 3 to 16: Rep row 2. 
Fasten off, block and measure.


Additional Notes:

The lace yoke part is about 5 inches from neck edge to the beginning of the solid stitch part.
Here's my test project for the bigger-size range (the last two sizes in the pattern). The yoke is 2 pineapple patterns more than the yoke for the first three sizes in the pattern.


The yoke is quite stretchy too...and the last two sizes in the pattern will be quite huge compared to the sample project in the magazine, which is the second size in the pattern. The dressform here is a size 34" bust, and the project comes to approx. 37" at the bust (unstretched).

Crochet test project, lace yoke


By the way, here's the first sample I made, shown here as my design proposal submitted to Interweave. Its closest to the first size in the pattern. Worn here with 1 1/2" negative ease.

Lace yoke top
Lace-yoke Top


Please let me know if you have a question or comment about this design. I'll be adding notes here as needed for clarification.


Tuesday, May 31, 2016

Open-weave Rattan stitch Poncho - free crochet pattern


A knit-look is achieved with the use of a bigger hook than is usually used for thread, and from the unique combination of stitches. This poncho looks good on, and fits a wide range of bust sizes and body shapes. Pattern can also be easily modified to a different size. 
It is best to make a gauge swatch first, before making a wearable.
(View this pattern on Ravelry)

Open-weave Rattan Stitch Poncho
by Mimi Alelis
http://mycrochetstuff.blogspot.com/2016/05/open-weave-rattan-stitch-poncho-free.html

Materials
Cotton thread size 8, Monaco or Cannon , 5-6 balls
4mm crochet hook
Stitches used
ch - chain
sc - single crochet
dc - double crochet 
esc - extended single crochet: insert hook in next stitch (or space), yarn over and pull up a loop, yarn over and draw through one loop to make a ch, yarn over and pull through two loops on hook to complete the stitch.
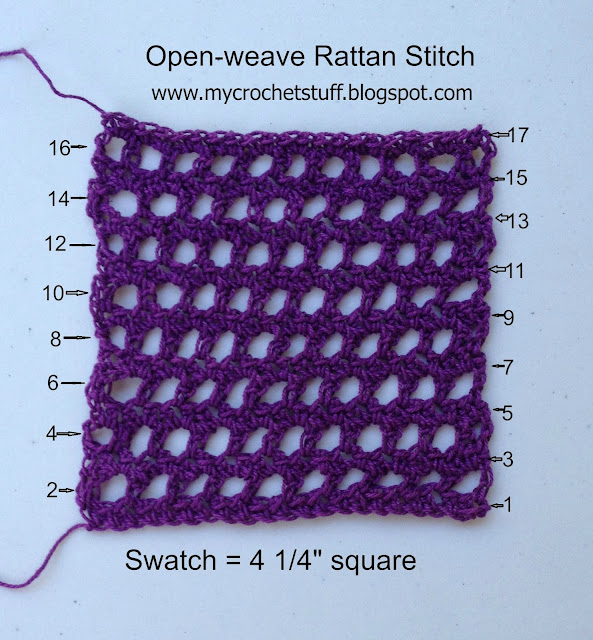
Gauge Swatch (4 1/4" square) (diagram here)
Row 1: Ch 22 (increase or decrease in multiples of 4), esc in 2nd ch from hook and in each ch across, turn. (21 esc)
Row 2: Ch 2 (does not count as st), dc in the same st, ch 2, skip one esc, sc in next, (ch 3, skip one esc, sc in next) repeat across, end with ch 2, dc on the last st, turn. (10 ch-spaces)
Row 3: Ch 1, 2 esc in each ch-space across, esc on last st, turn. (21 esc)
Row 4: Ch 4, sc in the next st, (ch 3, skip one esc, sc in next) repeat across, end with ch 2, dc on the last st, turn. (11 ch-spaces)
Row 5: Ch 1, esc in same ch-space, 2 esc in each ch-space across, turn. (21 esc)
Rows 6-17: Repeat rows 2 - 5. Fasten off.


Poncho Pattern
Main Body, make 2 (each rectangular piece measures approx. 35 x 17 inches)
Row 1: Ch 154 (loosely), (inc or dec in multiples of 4), esc in 2nd ch from hook and in each ch across, turn. (153 esc)
Row 2: Ch 2 (does not count as st), dc in the same st, ch 2, skip one esc, sc in next, (ch 3, skip one esc, sc in next) repeat across except on last 2 sts, ch 2, dc on the last st, turn. (76 ch-sps)
Row 3: Ch 1, 2 esc in each ch-space across, esc on last st, turn. (153 esc)
Row 4: Ch 4, sc in the next st, (ch 3, skip one esc, sc in next) repeat across, end with ch 2, dc on the last st, turn. ( 77 ch-sps)
Row 5: Ch 1, esc in same ch-space, 2 esc in each ch-space across, turn. (153 esc)
Rows 6-65: Repeat rows 2 - 5. 
Fasten off, leaving a long tail for sewing.
Assembly
Lay out the 2 pieces in a V-formation as follows.
1. Lay one piece diagonally on the left, with the foundation edge on the outer left side, and one corner pointing downwards to the center.
2. Lay the other piece diagonally on the right (to overlap the left piece), with the foundation edge on the outer right side and one corner pointing to the center. (see pic below)
3. Fold the top left short edge to the corresponding edge of the right piece, to an approximate length of 17" 
4. Sew using the same thread, applying an invisible seam (see tutorial on vogueknitting) .
5. Flip the back side to the front, while maintaining the V-formation, and repeat steps 3-4.
Neck Edging
Rnd 1: Attach thread at the neck edge, ch 1, sc in every stitch, join with sl st in the 1st sc.
Rnds 2-3: Ch 1, sc in back loop only of each sc around, join.
Fasten off and weave in ends.


Open-weave Rattan Stitch Poncho
poncho assembly
Assembly step 1 & 2


(more photos on Ravelry)


Tuesday, May 24, 2016

Crochet cotton projects

I have always loved working with cotton! Among cotton threads and yarns available to me, I have my favorites.

Schachenmayr Catania is a sportweight 100% cotton yarn which I first used for purses...then I realized it's usefulness for baby accessories since it is thicker than thread, but softer. So I searched patterns and tried some that worked, like this cute baby girl booties. I made these for my 3-month-old niece and for my coming soon grandbaby girl!

Crochet Baby Booties

I have modified the closure...so that instead of sewing a button, I crocheted one using cotton thread (size 8). I also crocheted flower petals around the buttonhole. Here's how I did it:
Crocheted button: with cotton thread and 2mm hook, ch 3, 4 tr-cluster in the 1st ch, fasten off leaving a 10-inch tail, sew the cluster into a ball, then sew it securely on the bootie. 
Crocheted flower petals: attach thread near the buttonhole, make 10 slip stitches around the hole, join on the 1st slip stitch (ch 3, 2dc-cluster on the same st, skip one slip stitch, slip stitch on the next stitch) 5 times, fasten off and weave in ends.

Next is another cotton baby project, this time its worsted weight, and 85% cotton. Premier Yarns Home Cotton became my favorite worsted weight for accessories and amigurumis because it is softer and easier to work with.
Crochet Baby Shoes

For this baby shoes, I used a pattern I bought several years ago. One thing I learned in choosing patterns for babies, it's so hard to choose!...most of it look so cute in photos but not all of it actually fits right or is practical to use for babies. Most of it don't have modeled pics...so you will only know it works once you've tried it on a baby. 
I think I will be making more baby items for the babies in my family and extended family...I get so inspired when I see delighted recipients of my handmade gifts :)

Next is my new wearable design using cotton thread, size 8. The brand I use is either Monaco or Cannon. Size 8 cotton thread is what's readily available in my area and I also find it to be the best option for our prevailing warm weather. 


Here'a a poncho I made...one that is light and stylish as well. It is a very slow, monotonous project...but I like the resulting fabric so much. 
I have written down the pattern and will post here soon.
Two more cotton thread projects I recently made can be viewed here.

And last but not least among my favorite cottons is cotton thread size 10. I prefer this when making my own original design, since it can easily be substituted with popular brands around the world. It is just a bit thinner than size 8 cotton, and so many patterns can work for both size 8 and size 10 thread.

Crochet sample project
Add caption

Here's a peek of me working on my design submission several months back. I used Aunt Lydia's size 10 cotton thread. 

Tuesday, April 26, 2016

Open-weave Rattan Stitch pattern - free crochet pattern

Here's a crochet stitch pattern I made up and called open-weave rattan stitch. It came up when I wanted to crochet a mesh shawl different from the ordinary loopy one I previously made (tropical shawl). Still using our local cotton thread size 8, I wanted the fabric to be stretchy. To achieve this, I used a bigger hook than usual. The pattern is quite simple, though the use of esc stitch (extended single crochet) makes it unique. Its a 4-row repeat pattern...it looked to me like the rattan weave I've seen on furnitures (pic here), except that the holes are not lined up straight, but diagonal.

The first shawl project I made using this stitch pattern is shown here. It starts at the long edge of the shawl and ends at the tip.

For now, here's the pattern for the swatch I made.

Crochet rattan stitch
Open-weave rattan stitch crochet pattern

Materials:
Cannon cotton thread, size 8, (100% cotton thread)
Crochet hook size 4mm
Gauge swatch measures 4 1/4" square

Stitches used
ch - chain
sc - single crochet
dc - double crochet 
esc - extended single crochet: insert hook in next stitch (or space), yarn over and pull up a loop, yarn over and draw through one loop to make a ch, yarn over and pull through two loops on hook to complete the stitch.

Pattern
Row 1: Ch 22 (increase or decrease in multiples of 4), esc (extended single crochet) in 2nd ch from hook and in each ch across, turn. (21 esc)
Row 2: Ch 2 (does not count as st), dc in the same st, ch 2, skip one esc, sc in next, (ch 3, skip one esc, sc in next) repeat across, end with ch 2, dc on the last st, turn. (10 ch-spaces)
Row 3: Ch 1, 2 esc in each ch-space across, esc on last st, turn. (21 esc)
Row 4: Ch 4, sc in the next st, (ch 3, skip one esc, sc in next) repeat across, end with ch 2, dc on the last st, turn. (11 ch-spaces)
Row 5: Ch 1, esc in same ch-space, 2 esc in each ch-space across, turn. (21 esc)
Rows 6-17: Repeat rows 2 - 5. Fasten off.


Poncho project using the open-weave rattan stitch - pattern here.

crochet poncho
mycrochetstuff


Saturday, September 26, 2015

Circular Scarf - free pattern

Circular Scarf Pattern
Circular Scarf

Circular Scarf
A simple crochet project using only one ball of cotton thread. Made up of a repetitive pattern that is easy to do, and quite addicting. 
This design has two innovations: 1. no long starting chain, no  foundation single crochet (fsc) or double crochet (fdc), and 2. no need to add edging rounds, it begins with a neat edge.

Yarn: Coats and Clark, Anchor Lifestyles mercerized cotton, size 10 (40 g), Color, 1 ball
Hook: Size 2.5 mm (C or 4/0), adjust hook size if necessary to obtain correct gauge
Notions: yarn needle for weaving ends
Gauge: 5 pattern repeats and 9 rows = 4" in pattern stitch
Finished measurement: approx. 35 " (89 cm) circumference, 5 3/4" (14 1/2 cm) wide

Notes: Pattern is worked in rounds, turned after every round.
To customize length, increase or decrease pattern repeats on the 1st round. To customize width, increase or decrease rnds.

Stitches used
ch - chain
sl st - slip stitch
dc - double crochet
tr - treble crochet
Special stitch
2-tr Cluster – [Yarn over hook (yo) twice, insert hook in stitch, yo, draw yarn through stitch, (yo hook, draw yarn through 2 loops on hook) twice] 2 times, yo, draw yarn through 3 loops on hook.

Scarf
Rnd 1: Ch 5, tr in 4th ch from hook, (ch 6, tr in 4th ch from hook) repeat 43 times, ch 1, sl st in the 1st ch of this rnd — 44 pattern repeats Rnd 2: Ch 4, tr in the same st, (skip the tr and ch-3 in 1st rnd, 2-tr cluster in the next ch, ch 3, dc in 3rd ch from hook, 2-tr cluster in the next ch) repeat around, sl st on the 1st tr of this rnd to join, turn. Rnd 3: Ch 4, tr in same st, (2-tr cluster in the next tr, ch 3, dc in 3rd ch from hook, 2-tr cluster in the next st) repeat around, join, turn. Rnds 4-12 (or desired width): Repeat rnd 3.
Fasten off and weave in ends.


Crochet scarf
Cluster Stitch Pattern

Saturday, July 04, 2015

Crochet a Tank top

I love how this project turned out. It was relatively easy to make, though it looked like a complicated design. 
Pattern: Neox Tanktop, Pierrot Gosyo Co., Japan
crochet top by mimi
Crochet Tank Top
 It came out a size small (32-34" bust)...which is just right for me. The color of the thread looks different in the photos as it actually looks closer to skin color. 

Crochet fashion top
Crochet tanktop

Project details on Ravelry.

Tuesday, March 31, 2015

Pineapple Square Crochet Motif

This is from a pattern for a beach cover-up. I recently found this pattern on Ravelry...I think the diagram is from a Russian designer. I immediately decided to make this one and I'm determined to finish this as a beach cover-up.
This is exactly the kind of motif I'm looking for. First, it is very suitable to use thread for this. Second, it is a big lacy square that works up quickly. This can be joined as you go, without leaving too many ends to weave in. As a bonus, it can easily be made bigger or smaller by adding or subtracting rounds and rows. Lastly, I'm able to use our local size 8 threads (which is cheaper). Though this can also be made using any size 10 thread.
Because I can't wait to blog about this, here's the first square I just finished:
(Note: I worked up to rnd 18 here, but it became a bit big for me so I ended up with 17 rnds per motif.)

pineapple crochet square
crochet pineapple square


Thursday, February 12, 2015

Bruges Lace crochet

Bruges lace is an easy way to add a twist to your crochet...(Google: what is bruges lace?) Its usually made with dc rows and a loop of chain at the end of the row. Also it is common to make strips of this lace and join them with chain loops or other crochet stitches. Using this type of construction, one can make anything from home decors to wearables. There are limitless variations for bruges lace. I'm working on a simple one, to use as a neck edging - inspired from an old doily pattern. I'm trying out an idea...possibly a new shrug design ;)


Saturday, August 16, 2014

Free crochet patterns previously published in the crochet calendars...

I'm finally doing something about the crochet patterns that got published in the crochet calendars of not so long ago. I'll be putting it here on my blog for those who'd like to make these projects :)

Meanwhile, these patterns are now available as pdf downloads on Ravelry:


Radiant Coaster


Spiral-ruffled Scrunchie


These are the patterns that will be published in subsequent posts:


Diagonal-striped coin purse


Multicolor Sling Purse


Oval Basket


Going around in circles bracelet

Monday, May 26, 2014

Bullion Stitch Flower - crocheting Irish motifs

As mentioned in previous post, I'm currently into irish crochet with the help of Kathryn White's The Go-to Book for Irish Crochet Motifs ;) I'm planning on making several different motifs.
Here's the 2nd one I finished. I think I made it in less than 1 hour last night...I really wasn't aware of the time as this pattern is very interesting. I had a hard time getting the bullion stitches right, though, but I was determined to finish this little flower motif :)