Wednesday, October 21, 2015

Handy Oval Makeup Purse - free crochet pattern

Crochet pattern - makeup purse
Handy Oval Makeup Purse

I got the idea for this makeup purse when I saw my sister-in-law using the Handy Coin Purse I gave her, to carry a lipstick and compact powder. Those basic makeup essentials hardly fit into the coin purse, but it seemed like a good idea. It saves the bag from clutter, and the front opening is most practical - since the contents of the purse can easily be seen and retrieved.
Then I recently saw the Oval Basket in my stash, it was folded flat and I immediately saw a purse!
I repurposed the pattern, using lighter weight yarn. The addition of a zipper makes it a cute handy purse. I'm thinking of making more, for gifts this Christmas. And this finished sample I'm sure, will delight my SIL!

Handy Oval Makeup Purse
by Mimi Alelis
October 2015
(updated January 2017)
Materials
Schachenmayr nomotta Catania, 100% cotton, sport weight yarn, 25 gms. (one skein is enough for 2 purses)
Crochet hook 3.5 mm (or 6/0), or hook to match your yarn
Zipper, approximately 8 inches
Needle and sewing thread
Gauge: Rnds 1-3 = approx. 2 3/8" diameter
Finished measurement: sample is approx. 7 " in  length, and 4 " wide measured at the widest part

Notes: Beginning ch 3 counts as dc. Bottom will curl initially, but will flatten when the side is done.

Bottom
Rnd 1: Ch 4, 13 dc in 4th ch from hook, (or, begin with a magic ring, ch 3, 13 dc in ring), sl st on top of beginning ch 3 to join. (14 dc)
Rnd 2: Ch 3, dc in same st, 2 dc in each dc around, join with sl st. (28 dc)
Rnd 3: Ch 3, dc in same st, dc in next dc, (2 dc in next dc, dc in next dc) repeat around, join. (42 dc)
Rnd 4: Ch 3, (2 dc in next dc, dc in next) 6 times, 2 hdc in next dc, hdc in next 6 dc, 2 hdc in next dc, dc in next dc, (2 dc in next dc, dc in next) 6 times, 2 hdc in next dc, hdc in next 6 dc, 2 hdc in last dc, join. (38 dc and 20 hdc)
Rnd 5: Ch 2 (counts as hdc), hdc in next 2 dc, *dc in next 2 dc, 2 dc in each of the next 9 dc, dc in next 2 dc, hdc in next 5 sts, sc in next 6 sts**, hdc in next 5 sts, repeat from * to **, hdc in next 3 sts, join. (76 sts)
Side
Rnd 6: Ch 3, dc in next st, sc in next 2 sts, (dc in next 2 sts, sc in next 2 sts) repeat around, join. (76 sts)
Rnd 7: Ch 1, sc in same st, sc in next dc, dc in next 2 sc, (sc in next 2 dc, dc in next 2 sc) repeat around, join.
Rnds 8 -15: repeat rnds 6 and 7, alternately. (76 sts)
Rnd 16: (edging and handle) Ch 1, sc in 17 sts, sc2tog, ch 16 for loop (make longer if preferred), sl st in the base of loop, sl st in each ch, sc in the next 37 sts, sc2tog, sc in remaining 20 sts.
Fasten off and weave in ends.
Finishing: Sew the zipper

Saturday, September 26, 2015

Circular Scarf - free pattern

Circular Scarf Pattern
Circular Scarf

Circular Scarf
A simple crochet project using only one ball of cotton thread. Made up of a repetitive pattern that is easy to do, and quite addicting. 
This design has two innovations: 1. no long starting chain, no  foundation single crochet (fsc) or double crochet (fdc), and 2. no need to add edging rounds, it begins with a neat edge.

Yarn: Coats and Clark, Anchor Lifestyles mercerized cotton, size 10 (40 g), Color, 1 ball
Hook: Size 2.5 mm (C or 4/0), adjust hook size if necessary to obtain correct gauge
Notions: yarn needle for weaving ends
Gauge: 5 pattern repeats and 9 rows = 4" in pattern stitch
Finished measurement: approx. 35 " (89 cm) circumference, 5 3/4" (14 1/2 cm) wide

Notes: Pattern is worked in rounds, turned after every round.
To customize length, increase or decrease pattern repeats on the 1st round. To customize width, increase or decrease rnds.

Stitches used
ch - chain
sl st - slip stitch
dc - double crochet
tr - treble crochet
Special stitch
2-tr Cluster – [Yarn over hook (yo) twice, insert hook in stitch, yo, draw yarn through stitch, (yo hook, draw yarn through 2 loops on hook) twice] 2 times, yo, draw yarn through 3 loops on hook.

Scarf
Rnd 1: Ch 5, tr in 4th ch from hook, (ch 6, tr in 4th ch from hook) repeat 43 times, ch 1, sl st in the 1st ch of this rnd — 44 pattern repeats Rnd 2: Ch 4, tr in the same st, (skip the tr and ch-3 in 1st rnd, 2-tr cluster in the next ch, ch 3, dc in 3rd ch from hook, 2-tr cluster in the next ch) repeat around, sl st on the 1st tr of this rnd to join, turn. Rnd 3: Ch 4, tr in same st, (2-tr cluster in the next tr, ch 3, dc in 3rd ch from hook, 2-tr cluster in the next st) repeat around, join, turn. Rnds 4-12 (or desired width): Repeat rnd 3.
Fasten off and weave in ends.


Crochet scarf
Cluster Stitch Pattern

Sunday, September 13, 2015

Two lovely shawls, ten years ago...

Looking back at my projects posted on Ravelry, I reviewed these two shawls made 10 years ago!
These two shawls remind me of the beginning of a new age of crochet (at least for me...), since these were made from among the first patterns I found on the web. Oh, those were the days when we crocheters were so eager to blog and love looking at each others finished projects...appreciated most anything crochet, and amazed that we could instantly share to anyone around world ;) We still do now, but at that time we were so excited...now it seems to be a given and there's just too much out there to see, we hardly take the time to admire each and every project...

My lovely (and much younger) sister used to model for me, and these also remind me of that time she's about to take off... (she's now settled in the UK with her hubby and kid).


Project details on Ravelry

Project details on Ravelry

I printed the patterns at once, for I guessed it wont be there forever. I was right. The first pattern though, is still available on the Internet archives (pattern). The other one became a for sale pattern at the Mani di Fata website.

Monday, August 17, 2015

The Crochet Book, a lovely crochet kit...

The Crochet Book
Saw this on The Book Depository and thought I'd share...this can be a lovely gift for yourself or for a fellow crocheter (especially for beginners) :)
The package includes all of the above, and shipping is included as well...since its free worldwide delivery as always on The Book Depository.

Monday, August 03, 2015

Handy Coin Purse - crochet pattern


I made these coin purses for some street kids I met last week.

I chose this design since it finishes up quickly and is suitable for both boys and girls. It is easy to hold, and with a finger inside the loop, it is secure in your hand.
I made the fabric ones from recycled denims, and the crocheted one from denim-like yarn. This project is quite simple, except for the sewing of the zipper. You can sew it by hand or by machine - I tried both, and there's not much difference...its not easy! Its a necessary part of the design though.

Here's a simple crafting tutorial to inspire. Any sturdy fabric, or any crochet stitch pattern can be used...I chose a mesh stitch pattern to make it quick and light...


Handy Coin Purse
Materials
     Cardboard pattern measuring 4 1/2" x 6 1/2"
     Zipper, approximately 4 1/2 inches (I used zipper from old denim jeans)
     Nylon cord, measuring 4 inches, or belt loop recycled from denims
     Yarn of your choice (I used 4-ply fingering yarn, a cotton/acrylic blend)
     Crochet hook 2.5mm (or 4/0), or hook to match your yarn.
Finished measurement: approx.4 1/2 " in height (excluding loop), and 3 1/4 " wide, measured at the bottom


Note: For crochet version, the cardboard pattern is just a guide to get the desired measurement.

Instructions:
Ch 2 at the beginning of row counts as 1st dc.

Row 1:Ch 54 (or chain an even number to an approximate length of 7 1/2"), dc in 3rd ch from hook, (ch 1, skip 1 ch, dc in next ch) repeat across, dc in last ch, turn.
Row 2: Ch 2, dc in next dc,(ch 1, dc in next dc) repeat across, dc in last dc, turn.
Rows 3-17: Repeat row 2. Fasten off.

Crochet loop (optional): Chain to measure 4", sl st on 2nd ch from hook, sl st on each ch across, fasten off leaving enough tail for sewing.

Sewing and Finishing:
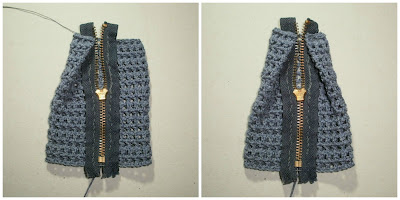
1. Fold the sides toward the center, leaving enough space for the zipper closure. With matching color thread, sew the zipper in place.


2. After attaching zipper, turn the project inside out, position the loop and sew it at the center top edge.


3. Fold one side towards the center and sew it across the top. Do the same on the other side.

crochet purse

4. Sew the bottom side across. Trim the excess length of the zipper.

crochet purse


5. Turn right side out and its done!

Crochet coin purse


Denim coin purse
For denim version, trace the cardboard pattern on the wrong side of the fabric and add a sewing allowance on all sides before cutting.

Fold the sides along the seam allowance. Sew the zipper and finish up the same as instructed above.


Saturday, July 04, 2015

Crochet a Tank top

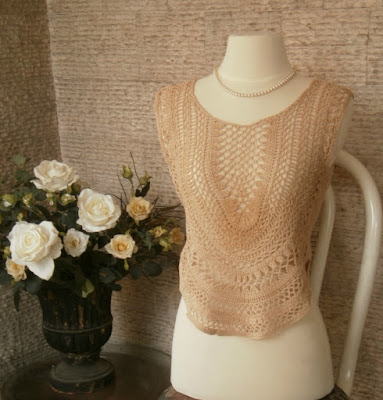
I love how this project turned out. It was relatively easy to make, though it looked like a complicated design. 
Pattern: Neox Tanktop, Pierrot Gosyo Co., Japan
crochet top by mimi
Crochet Tank Top
 It came out a size small (32-34" bust)...which is just right for me. The color of the thread looks different in the photos as it actually looks closer to skin color. 

Crochet fashion top
Crochet tanktop

Project details on Ravelry.