Friday, March 16, 2018

Quick and pretty DIY jewelry!


Seems I got a lot more done this week - with organizing, decluttering and crafting projects!
I had some pendants and beads, some from old/broken bracelets and necklaces and keychains, mostly from my Mom...and they were just set aside for years (some for decades!)... I did a bit of digging into my stash for the right materials, and with a little help from my handy pliers, I was able to make myself 6 necklaces and a bracelet - all looking new and surely one-of-a-kind.
This crafting project came up when I bought these elastic headbands at the supermarket, Its actually tight as a headband - gives me a headache. But its just the right size for a necklace, like the one that I usually wear. Its 18 inches in circumference.

elastic headbands
I bought two packs of these elastics - its only P50. ($1.) per pack of 4 pcs. So that's the only money I spent...and after a few hours, I have new jewelry! I was never this happy as when I bought a fashion accessory at the store. These may look simple, but to me they are just perfect for my style!
So far I have 6 new necklaces and 1 bracelet...I'm thinking of some more to make 😉


Saturday, March 10, 2018

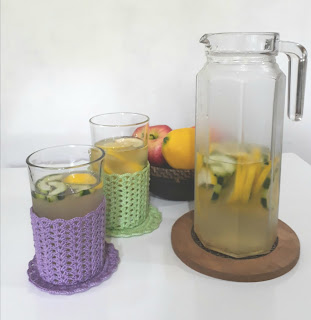
Glass Holder and Coaster Set - free crochet pattern

crochet glass holder and coaster
Glass holder and coaster set

Glass Holder and Coaster
copyright Mimi Alelis, 2018
This pattern can only be found on this link:
http://mycrochetstuff.blogspot.com/2018/03/glass-holder-and-coaster-set-free.html

Materials
Cannon cotton thread, size 8 (can be substituted with size 10 thread), one ball, 50gm (note: one ball will make 2 sets of glass holder and coaster in this pattern)
Crochet hook size 1.75mm
Yarn needle to weave in ends
Finished size: Glass holder: about 4 inches across top, and 4 inches in height, measured flat; Coaster is about 4 inches in diameter

Glass holder
Note: Ch 3 at the beginning of rnds counts as dc.
Start with magic ring, (or, ch 4, sl st in 1st ch to form a ring),
Rnd 1: Ch 3, 14 dc in ring, join with sl st to beginning ch 3. (15 dc)
Rnd 2: Ch 3, dc in same st, 2 dc in each dc around, join. (30 dc)
Rnd 3: Ch 4 (counts as dc and ch 1), dc in next dc, (ch 1, dc in next dc) repeat around, join. (30 dc with ch-1 space in-between)
Rnd 4: Sl st in next ch-1 space, ch 3, dc in same sp, 2 dc in each ch-1 sp around, join. (60 dc)
Rnd 5: Ch 3, dc in same st, ch 2, 2 dc in same st (shell made), [skip 3 dc, (2 dc, ch 2, 2 dc) in next dc] repeat around, join. (15 shells)
Rnd 6-15: Sl st in ch-2 sp, ch 3, dc in same sp, ch 2, 2 dc in same sp, (2 dc, ch 2, 2 dc) in each ch-2 sp around, join. (15 shells)
Rnd 16: Ch 1, Ch 1, (5 sc in ch-2 sp of shell, sc in space between shells) repeat around, join with sl st in 1st sc.
Fasten off and weave in ends.

Coaster
Note: Ch 3 at the beginning of rnds counts as dc.
Start with magic ring, (or, ch 4, sl st in 1st ch to form a ring),
Rnd 1: Ch 3, 14 dc in ring, join with sl st to beginning ch 3. (15 dc)
Rnd 2: Ch 3, dc in same st, 2 dc in each dc around, join. (30 dc)
Rnd 3: Ch 3, 2 dc in next dc, (dc in next dc, 2 dc in next dc) repeat around, join. (45 dc)
Rnd 4: Ch 3, dc in next dc, 2 dc in next, (dc in next 2 dc, 2 dc in next dc) repeat around, join. (60 dc)
Rnd 5: Ch 3, dc in next 4 dc, 2 dc in next, (dc in next 5 dc, 2 dc in next dc) repeat around, join. (70 dc)
Rnd 6: Ch 3, dc in next 5 dc, 2 dc in next, (dc in next 6 dc, 2 dc in next dc) repeat around, join. (80 dc)
Rnd 7: Ch 3, dc in same st, ch 2, 2 dc in same st (shell made), [skip 3 dc, (2 dc, ch 2, 2 dc) in next dc] repeat around, join. (20 shells)
Rnd 8: Ch 1, (5 sc in ch-2 sp of shell, sc in space between shells) repeat around, join with sl st in 1st sc.
Fasten off and weave in ends.
Note: the coaster will normally curl up like this:


It is easy to flatten, just dampen (or spray with a little water) and press.


Tuesday, January 09, 2018

Crochet and Other Stuff in 2017

Hello, welcome 2018!
As usual, here's a round-up of my crafty stuff for the past year. I think 2017 was good in many ways, for me...there was a lot to be thankful for.- blessings received, lessons learned. I got more inspired...gained new friends, reconnected with old friends...On the crafting side, I'm happy to be able to continue sharing my work with fellow crocheters, crafters and those who appreciate handmade stuff.

Now for the (not-so) boring details of my crafting in 2017 😉

Crochet Patterns
I was able to add 5 free crochet patterns here in my blog:


Hearts flower - heart-shaped petals make up this flower.

Minnie Mouse Hat 


Hello Kitty Hat


Projects
I finished only about 16 crochet projects in 2017... mostly small projects, including 4 santa hats and a thread snowflake...
Some of my favorite projects and photos:
crochet and woven ball for my granddaughter

banner for my youtube channel

playful santa hats

new year wall decor with crocheted snowflake

I also finished a sample project and pattern for my design submission...that if all goes well, will be published this year.

I did other craft-related projects and I'd like to share my crafting space makeover - included here is my first dreamcatcher, using my mother's crocheted doily.


Mimi Alelis Designs workspace
workspace makeover
Mimi Alelis Designs workspace
workdesk makeover

dreamcatcher featuring my mother's doily


Also, my diy photo-session last September...and I already forgot where I edited these 😁

crocheting in a corner of my workspace
cap sleeve cardigan

Looking forward to a peaceful and crafty year ahead!
Happy New Year!!


Thursday, August 31, 2017

My Crochet News

Hello! Back here again to share some of my recent crochet-related stuff!

1. My Crochet Channel https://www.youtube.com/c/MimiAlelis


Might be quite late for me to join in on youtube - since I intend to monetize my channel... (Google will only evaluate a channel when it reaches 10,000 views.) It is a long long way to go, but... Thanks to my friends, crochet buddies. and followers for their support - I am inspired! 😊
So far, I have 8 crochet-related videos...I guess I need to make a hundred more!..haha

2. Crochet Books, The Book Depository


This came today, with free and fast international shipping from The Book Depository! I also timed my purchase when these books were discounted. 😉
I'm planning to make gifts for babies and kids in my family...I'm so happy how the family has grown - more nephews, nieces (includes grandnieces/nephews), and of course my very own granddaughter!

3. Crochet Design Submissions
Though my designs are few and far between, I'm still into it - wanting to get published again. I've just mailed a proposal for a top I made two years ago...goodluck to me 😀

By the way, I have contributed a pattern (Shells and Flowers Shrug) to the 2018 Crochet Calendar and have just received my complimentary copy. I submitted late and had to take my own photo...and I didn't really like it 😛. (This made me determined to take better photos next time!)


4. Modeling my Crochet
I really like wearing the crochet clothes I make - as for modeling it, I just had to...I seldom have someone else to model it for me, or even to take the photos - so I had to learn to do both. I never mastered any of the things I do, but I'm content to be able to pull things through...😊
Here's the result of my latest "pictorial" and editing efforts:

Halter Top by Mimi Alelis
Shell Halter Top

The Shell Halter Top crochet pattern is for sale on Ravelry and on Etsy.
That's all for now, thanks for looking!

Friday, August 11, 2017

Going Around in Circles Bracelet - free crochet pattern


Going Around in Circles Bracelet

A stylish design for use with variegated or multicolored threads or yarn.  Any thread or yarn will do, using the appropriate size of hook.

Materials: Size 10 thread and size 1.5mm hook
Finished size: approximately 6 inches

Note: Circles are crocheted in a spiral, and worked one after another. Do not join rounds and do not cut off thread, unless specified.

Bracelet
Leave about 8 inches tail at the beginning, to be used for sewing button later.
First circle
Rnd 1: Ch 2, 8 sc in 2nd ch from hook, do not join but continue to the next rnd. (8 sc)
Rnd 2: 2 sc in each sc around, sl st on next st. (16 sc) Continue on to
Big circle
Rnd 1: Ch 6, 8 sc in 2nd ch from hook. (8 sc)
Rnd 2: 2 sc in each sc around. (16 sc)
Rnd 3: (Sc in next sc, 2 sc in next) repeat 4 times, with right side facing, sl st on the same st as the last st of previous circle, (sc in next sc, 2 sc in next) repeat 4 times, sl st on the next st. (24 sc)
Small circle
Rnd 1: Ch 5, 8 sc in 2nd ch from hook. (8 sc)
Rnd 2: 2 sc in each of the next 4 sc, sl st on the same st as the last st of previous circle, 2 sc in each of the next 4 sc, sl st on next st. (16 sc)
Continue making circles, alternating big and small, until you have 12 circles or until desired length.
Loop for button closure: Ch 12, sl st back to the base of the ch, sl st in each ch around. (Check to see if loop fits the button). Fasten off and weave in end.
Sew the button on the first circle.


Thursday, June 29, 2017

Crochet Makeover Flip-flops tutorial

Crochet makeover flip flops


How to prepare the slipper for crochet is demonstrated in my video on YouTube, please view here.


Materials:
Pair of rubber flipflops or sandals
Crochet thread, for the sole edge, I used cotton thread size 10 for the edging; Catania cotton sportweight yarn for the strap
Crochet hook size 1.5mm and 3mm
Yarn needles for thread and for yarn
Hot-melt glue gun, or fabric glue


(Pattern for the strap is derived from my previous pattern found here.)

Instructions for crochet strap (for this makeover project):
Note: Work sl sts in back loop only.
Using sportweight yarn and 3mm hook, leave at least 6 inches tail at the beginning, ch 66,
Row 1: Sl st in 2nd ch from hook and on the next 7 chs, sc in the next 24 chs, 3 sc in the next ch (place marker in the middle st of the last 3 sc, move the marker up as you go), sc in next 24 chs, sl st in the last 8 chs, turn.
Row 2: Sl st in the first 8 sts, sc in the next 25 sc, 3 sc in the st where marker is placed, sc in the next 25 sc, sl st in the last 8 sts, turn.
Row 3Sl st in the first 8 sts, sc in the next 26 sc, 3 sc in the st where marker is placed, sc in the next 26 sc, sl st in the last 8 sts, turn.
Row 4: Sl st in the first 8 sts, sl st in both loops of each sc across, sl st in back loops of last 8 sts, turn.
Row 5: Work 2 sl st at the end of row to get to the opposite edge, sl st in each st across. Fasten off.


crocheted strap


Assembly:
Secure the middle of the crochet piece by sewing around the center joint of the flipflop strap. Do the same with the ends of the straps using the tail ends of the crochet. Apply glue on the top of the flip flop straps and position the crochet piece.