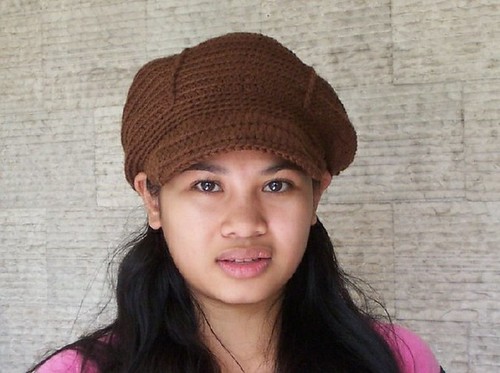

I made this cap pattern after looking at the free patterns online and not finding one just right for my acrylic yarns.
A smaller cap with brim pattern is shown here.
For bulkier yarns, try this hat pattern at Garnstudio; or this cap pattern at crochetville; or this newsboy cap pattern.
Still can't decide which cap to make? Here's a very neat pattern with tutorial pictures: Newsboy Cap by Mary Jane Hall
Now here is my own pattern, which I think needs some improvement on the brim part.
If you come up with an improved version, hope you let us know.
Beret cap with brim Ravel it!
Designed by Mimi Alelis © 2006
Size: Medium to Large
Materials:
4-ply worsted-weight acrylic yarn, 4 skeins (35 meters each) Carmencita dark brown used in sample
Aluminum Crochet Hook size 5mm. (H-8)
Abbreviations
ss = slip stitch sc = single crochet hdc = half double crochet
st = stitch ch = chain fpdc = front post double crochet
Gauge: Rnds 1-3 is approx. 2 inches in diameter
Instructions
With 5 mm. hook and acrylic yarn, working in rounds, start with ch 4, ss to form ring.
Rnd 1: 10 hdc in ring. (10 sts) Note: Ch 2 counts as first hdc of each round. Always join rounds with ss. Crochet in back loops only, unless specified.
Rnd 2: 2 hdc in each st. fpdc on every alternate increase (20 sts) (5 fpdc)
Rnd 3: (1 hdc in 1 st, 2 hdc in next) rep. around. (30 sts) Note: Fpdc on every fpdc on this and every following hdc round.
Rnd 4: (1 hdc in each of next 2 sts, 2 hdc in next) rep. around. (40 sts)
Rnd 5: (1 hdc in each of next 3 sts, 2 hdc in next) rep. around. (50 sts)
Rnd 6: (1 hdc in each of next 4 sts, 2 hdc in next) rep. around. (60 sts)
Rnd 7: (1 hdc in each of next 5 sts, 2 hdc in next) rep. around. (70 sts)
Rnd 8: (1 hdc in each of next 6 sts, 2 hdc in next) rep. around. (80 sts)
Rnd 9: (1 hdc in each of next 7 sts, 2 hdc in next) rep. around. (90 sts)
Rnd 10: 1 hdc in each of next 8 sts, 2 hdc in next) rep. around. (100 sts)
Rnd 11: 1 hdc in each of next 9 sts, 2 hdc in next) rep. around. (110 sts)
Rnd 12: 1 hdc in each of next 10 sts, 2 hdc in next) rep. around. (120 sts)
Rnd 13 - 18: Hdc around (120 sts)
Rnd 19: decrease 10 sts evenly. (110 sts)
Rnd 20: decrease 10 sts evenly. (100 sts)
Rnd 21: decrease 10 sts evenly. (90 sts)
Rnd 22 -25: Sc in each st around. (90 sts) Fasten off.
Brim
NOTE: ch 2 at beginning of each row does not count as a stitch.
Row 1: work the brim with 2 strands of yarn, join on the 11th stitch from where cut-off. ch 2, hdc on next 6 sts, 2 hdc on next st, hdc on next 17 sts, 2 hdc on next st, hdc on next 6 (33 sts)
Row 2 : ch 2, (hdc tog next 2 sts) twice, hdc on next 12 hdc, 2 hdc on next hdc, hdc on next 12 hdc, (hdc tog 2 sts) twice (30 sts)
Row 3 : ch 2, hdc tog next 2 sts, hdc on next 26 sts, hdc tog last 2 sts (28 sts)
Row 4 : ch 2, (hdc tog next 2 sts) twice, hdc on next 9 sts, 2 hdc on next hdc, hdc on next 10 hdc, (hdc tog 2 sts) twice (25 sts)
Row 5: ch 1, sc tog next 2 sts, sc across each st except on last 2, sc tog last 2 sts (23 sts)
Do not fasten-off, continue with slip stitch on side of brim, around cap and the other side of the brim.
FASTEN OFF. Weave in ends with needle.
Hats made from this pattern:
by Gene in California:
this was made with RHSS WW County Rose using H (5mm) hook


(photos by Gene, more of his projects here)
More photos of finished projects are on my photo gallery.
Update: April 1, 2007
New! Brimmed hat from japanese pattern:

This is made from WW acrylic yarn (approx. 100 gms.) using 5mm hook. The pattern chart is found in this book.

All my designs in one page - thanks to Ravelry!
That is very cute!
ReplyDeleteA yarn swift is what you would use to wind hanks of yarn into balls of yarn.
http://www.numei.com/Thumbnails2/tn650_yarnswift.jpg
Thanks for your comment and the info, Deneen!
ReplyDeleteI just want to say.. You are great. I love your patterns.
ReplyDeleteThank you Amber, you're so sweet! Good luck on your work in caring for animals.
ReplyDeletethis is adorable! I don't know how I missed it.
ReplyDeleteThanks, Jaye! I didnt want a fitted cap so this is a bit loose. I want to make one for myself, but havent gotten to it yet ;)
ReplyDeletei fell in love with the look of this hat right away so i thought i'd give it a try. i'm not used to making hats, i usually do afghans, so working in rounds is kind of new to me. i got confused at the beginning; do i chain 2 before every round and count it as a hdc? i know what increases are and fpdc, but i'm not sure when to do them in rnd 2. please help!
ReplyDeleteThanks for your comment Danilane. I think you are having trouble with the first two rounds since I shortened the instructions. Here's a longer version.
ReplyDeleteRnd 1: Ch 2, 9 hdc in ring. Join to the starting ch. (10 sts) Note: Ch 2 counts as first hdc of each round. Always join rounds with ss. Now crochet in back loops only, unless specified.
Rnd 2: Ch 2, hdc in the same st. (1 hdc in next st, fpdc on same st, 2 hdc on the next st) 4 times, 1 hdc on the last st, fpdc on same st, join to the beginning of round. (20 sts) (5 fpdc)
thanks for the clarification! it really helped.
ReplyDeleteIn the "decrease 10 stitches evenly" rows, that means I decrease 10 each row, right? Would that then decrease the number of stitches for each of those rows or am I confusing myself?
ReplyDeleteThanks!
Oh, I see your point there, there's an error in the no. of stitches. It should be:
ReplyDeleteRnd 19: decrease 10 sts evenly. (110 sts)
Rnd 20: decrease 10 sts evenly. (100 sts)
Rnd 21: decrease 10 sts evenly. (90 sts)
I LIKE this pattern! I just haven't been happy with the summer hats I've seen, this is by far the cutest! I'm going to make one for me and one for my 3.5 year old. Thanks so much for sharing!
ReplyDeleteThank you Tori! I'm glad you like it ;)
ReplyDeleteThis looks wonderful! I have a question: my head is 23 inches around. I can't ever find a hat in the store to fit me. About how big of a head does this one fit?
ReplyDeleteHi! I measured the hat and it would fit from 21.5 to 23 inches head.
ReplyDeleteThanx, I had a beret cap like this one when my children were growing up years ago. Now I am able to crochet one for myself this winter. Thanx. . ."K"
ReplyDeleteI'm new to crochet Was does it mean to hdc tog next 2 sts?? Thanks
ReplyDeletehdc tog - yo, (insert hook in next st and pull up loop)twice. Yo and pull up loop through four loops on hook.
ReplyDeleteIs there a gauge?
ReplyDeleteI have only made doll hats, and need help!
The yarn i would like to use is VERY bulky and do not know what hook!
Thanx
a friend of mine saw your pattern and asked me to make one for her and her daughter. one of the coments says this pattern will with a head that is 21.5 to 23 inches. will the smaller version fit a 20.5 inch head?? can you email me the smaller version pattern. my email is carrie_dyer at sbcglobal dot net. thanks
ReplyDeleteThanks for all your comments and interest in this pattern!
ReplyDeleteI have added new links above and already edited the pattern to include gauge.
can you please explain front/back post? what exactly is meant by the "post"?
ReplyDeletewhat does it mean to crochet in back loops?
also can you explain this further: 2 hdc in each st. fpdc on every alternate increase (20 sts) (5 fpdc)
thank you.
I really really really love this hat and want to make a bunch of them for some teenagers. Help Me! I understand the stitches, but am having trouble reading the pattern. I especially don't understand Round 2,3 and probably most of the brim.
ReplyDeleteAny help from anyone would be much appreciated!
Thanks,
Kate
Thank you for your interest in my cap pattern. Since I dont have enough time to go over the pattern and the stitches, I suggest for you to google or search for the instructions for the particular stitches. As for the instructions this would probably help you to start:
ReplyDeleteRnd 1: Ch 2, 9 hdc in ring. Join to the starting ch. (10 sts) Note: Ch 2 counts as first hdc of each round. Always join rounds with ss. Now crochet in back loops only, unless specified.
Rnd 2: Ch 2, hdc in the same st. (1 hdc in next st, fpdc on same st, 2 hdc on the next st) 4 times, 1 hdc on the last st, fpdc on same st, join to the beginning of round. (20 sts) (5 fpdc)
The brim will be easy, once you are done with the main part. But you have to do it with two strands of yarn worked together, so the brim will be stiff.
i don't understand round 3, will you please help me????
ReplyDeleteOk, this will be a longer instruction for round 3, but I can see why its difficult to understand.
ReplyDeleteTo continue on with my previous comment:
NOTE: at the end of rnd 2 you should have 20 sts, including the 5 fpdc's.
Rnd 3: Ch 2 (counts as hdc), 2 hdc on next st, hdc on next st, hdc and fpdc on next.
(hdc on next st, 2 hdc on next st, hdc on next st, hdc and fpdc on next st) 4 times, join. (30 sts including the 5 fpdc's)
Now you can see the fpdc's creating a vertical line ;)
I'd like the pattern for the black hat worn by the guy but it says it's in a Japanese book. Could you please E-mail the pattern to me? victoriacarroll2sbcglobal.net I would also be interested in any long coat patterns you might have or other newsboy caps for boys. If you could also share with me how I could possibly patten my own ideas that would be really great. I hope I hear from you real soon. Thanks ahead for any help.
ReplyDeleteThanks for your comment.
ReplyDeleteSorry, the patterns in the book are subject to copyright. For more free patterns go to Crochet PatternCentral: http://www.crochetpatterncentral.com/
I'm crocheting this pattern and it looks fabulous so far, thank you!!! But now I'm having problems with the brim part. I've crocheted it and undone it three times but each time I can't get it to sit out like the brim in the picture, mine ends up sitting flat against the forehead. I'm sure I'm doing something wrong!!! Do you have any advice or tips about crocheting the brim and what I could be doing wrong? Thank you!!
ReplyDeleteHi, thanks for your comment!
ReplyDeletesorry, I think I've already written all the tips on this post. But first, did you use double strand for the brim? My pattern is not perfect, and the brim does tend to go downward a bit.
For a perfect-brimmed hat, I suggest the one found in the Japanese book that I posted about. If you can follow charts, its easy.
Hi! I love your pattern and am making a red one now. However, the person I'm making it for has a head circumference of 23.5 inches. Can you tell me which row (or rows) I need to increase so that it will stretch to fit her? THANK YOU!
ReplyDeleteThanks for your comment, Whitt. Maybe you can increase after rnd 12. Increase it by about 6 sts. And the following stitch counts for the next rows would have also increased by 6.
ReplyDeleteSo at rnds 22-25, you'll have 96 sts.
I think that would work, if we have the same gauge.
Thanks, Mimi. I figured that you might suggest not decreasing one of the 3 decrease rows, so I went ahead an crocheted Rows 13 - 18 already. Do you think I should pull it out and do what you suggest above?
ReplyDeleteYes, you could also do that. Follow the pattern up to rnd 20, then at rnd 21, decrease only by 4 sts, so you have 96 left. at rnds 22-25, you still have 96 sts instead of 90 sts.
ReplyDelete(Btw, I saw that my st count have typo errors and I'll correct it now.)
THANKS for your prompt replies! Do you want to see the hat when it's finished? If so, I can direct you to my knitting/crochet blog if you like, I'll post pics there. :-)
ReplyDeleteYes, I'd love to see your finished hat! Please leave a link here.
ReplyDeleteMimi - it's Gene in California. I just had a request for your pattern, so I pointed them here and saw the picture of my hat and link to some other projects. Thanks so much. I've started an Etsy Shop at http://www.etsy.com/shop.php?user_id=5301988
ReplyDeleteIf the link doesn't work just search for username CrochetDad.
Hi Gene! I see some interesting projects in your flickr photos...Goodluck on your Etsy shop :)
ReplyDeleteHi
ReplyDeleteGreat pattern, thanks. I wanted to let you know that the link to Mary Jane Hall's Newsboy cap doesn't work anymore--it goes to some kind of advertising/domain name site.
Hi, thanks for your comment!
ReplyDeleteI removed the link, but will try to find out if the pattern is still available online.
Hello,
ReplyDeleteIn the Newsboy Cap pattern by Jane Hall, she uses the term "End yarn off." Can you tell me what that means and how to do it?
Thank you
just what i was looking for!! thanks
ReplyDeleteHi,, I love this hat.. I have to make one for my Daughter and my Grandaughter who is a year old...
ReplyDeleteAny ideas on making it small for her??
Thanks.. Penny
Hi Penny, I haven't tried making it for a toddler...but my idea is to use sportweight yarn and maybe 2.5 or 3mm hook.
ReplyDeletei love it when i crocheted this beret.
ReplyDeleteI am trying to find the pattern forthe hat you made your sister...How do I find it?
ReplyDeleteThanks
relenned@verizon.net
What size hook would I use if my yarn is 198g
ReplyDeleteHi! For yarn substitution, follow the instruction for estimating gauge: Rnds 1-3 is approx. 2 inches in diameter. First use the hook suggested for that yarn, then change hook size if you need to approximate gauge in the pattern.
ReplyDelete