

I made this cap pattern after looking at the free patterns online and not finding one just right for my acrylic yarns.
A smaller cap with brim pattern is shown
here.
For bulkier yarns, try this
hat pattern at Garnstudio; or this
cap pattern at crochetville; or this
newsboy cap pattern.
Still can't decide which cap to make? Here's a very neat pattern with tutorial pictures:
Newsboy Cap by Mary Jane Hall
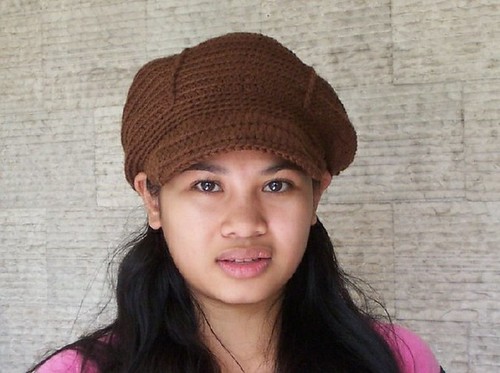
Now here is my own pattern, which I think needs some improvement on the brim part.
If you come up with an improved version, hope you let us know.
Beret cap with brim Ravel it!Designed by Mimi Alelis © 2006
Size: Medium to Large
Materials:
4-ply worsted-weight acrylic yarn, 4 skeins (35 meters each) Carmencita dark brown used in sample
Aluminum Crochet Hook size 5mm. (H-8)
Abbreviationsss = slip stitch
sc = single crochet
hdc = half double crochet
st = stitch
ch = chain
fpdc = front post double crochet
Gauge: Rnds 1-3 is approx. 2 inches in diameter
Instructions
With 5 mm. hook and acrylic yarn, working in rounds, start with ch 4, ss to form ring.
Rnd 1: 10 hdc in ring. (10 sts) Note: Ch 2 counts as first hdc of each round. Always join rounds with ss. Crochet in back loops only, unless specified.
Rnd 2: 2 hdc in each st. fpdc on every alternate increase (20 sts) (5 fpdc)
Rnd 3: (1 hdc in 1 st, 2 hdc in next) rep. around. (30 sts) Note: Fpdc on every fpdc on this and every following hdc round.
Rnd 4: (1 hdc in each of next 2 sts, 2 hdc in next) rep. around. (40 sts)
Rnd 5: (1 hdc in each of next 3 sts, 2 hdc in next) rep. around. (50 sts)
Rnd 6: (1 hdc in each of next 4 sts, 2 hdc in next) rep. around. (60 sts)
Rnd 7: (1 hdc in each of next 5 sts, 2 hdc in next) rep. around. (70 sts)
Rnd 8: (1 hdc in each of next 6 sts, 2 hdc in next) rep. around. (80 sts)
Rnd 9: (1 hdc in each of next 7 sts, 2 hdc in next) rep. around. (90 sts)
Rnd 10: 1 hdc in each of next 8 sts, 2 hdc in next) rep. around. (100 sts)
Rnd 11: 1 hdc in each of next 9 sts, 2 hdc in next) rep. around. (110 sts)
Rnd 12: 1 hdc in each of next 10 sts, 2 hdc in next) rep. around. (120 sts)
Rnd 13 - 18: Hdc around (120 sts)
Rnd 19: decrease 10 sts evenly. (110 sts)
Rnd 20: decrease 10 sts evenly. (100 sts)
Rnd 21: decrease 10 sts evenly. (90 sts)
Rnd 22 -25: Sc in each st around. (90 sts) Fasten off.
BrimNOTE: ch 2 at beginning of each row does not count as a stitch.
Row 1: work the brim with 2 strands of yarn, join on the 11th stitch from where cut-off. ch 2, hdc on next 6 sts, 2 hdc on next st, hdc on next 17 sts, 2 hdc on next st, hdc on next 6 (33 sts)
Row 2 : ch 2, (hdc tog next 2 sts) twice, hdc on next 12 hdc, 2 hdc on next hdc, hdc on next 12 hdc, (hdc tog 2 sts) twice (30 sts)
Row 3 : ch 2, hdc tog next 2 sts, hdc on next 26 sts, hdc tog last 2 sts (28 sts)
Row 4 : ch 2, (hdc tog next 2 sts) twice, hdc on next 9 sts, 2 hdc on next hdc, hdc on next 10 hdc, (hdc tog 2 sts) twice (25 sts)
Row 5: ch 1, sc tog next 2 sts, sc across each st except on last 2, sc tog last 2 sts (23 sts)
Do not fasten-off, continue with slip stitch on side of brim, around cap and the other side of the brim.
FASTEN OFF. Weave in ends with needle.
Hats made from this pattern:
by Gene in California:
this was made with RHSS WW County Rose using H (5mm) hook


(photos by
Gene, more of his projects
here)
More photos of finished projects are on my
photo gallery.
Update: April 1, 2007
New! Brimmed hat from japanese pattern:

This is made from WW acrylic yarn (approx. 100 gms.) using 5mm hook. The pattern chart is found in this book.

 All my designs in one page - thanks to Ravelry!
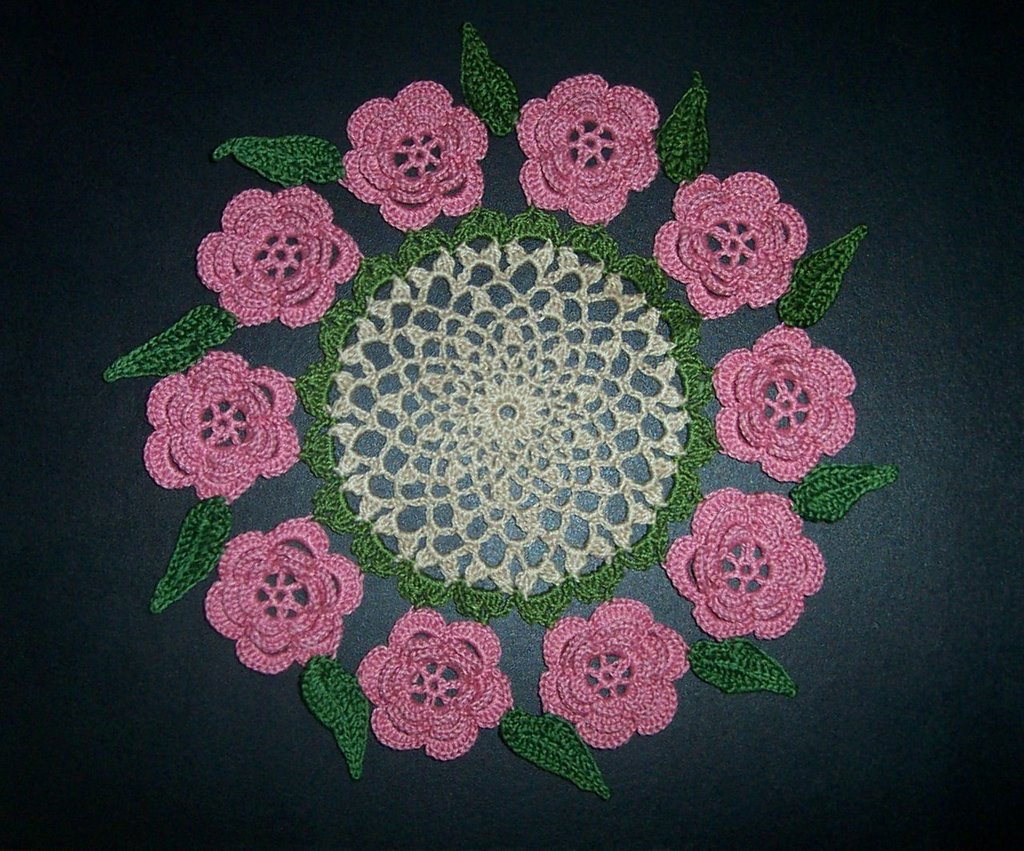 I made this doily just in time for valentines ;)
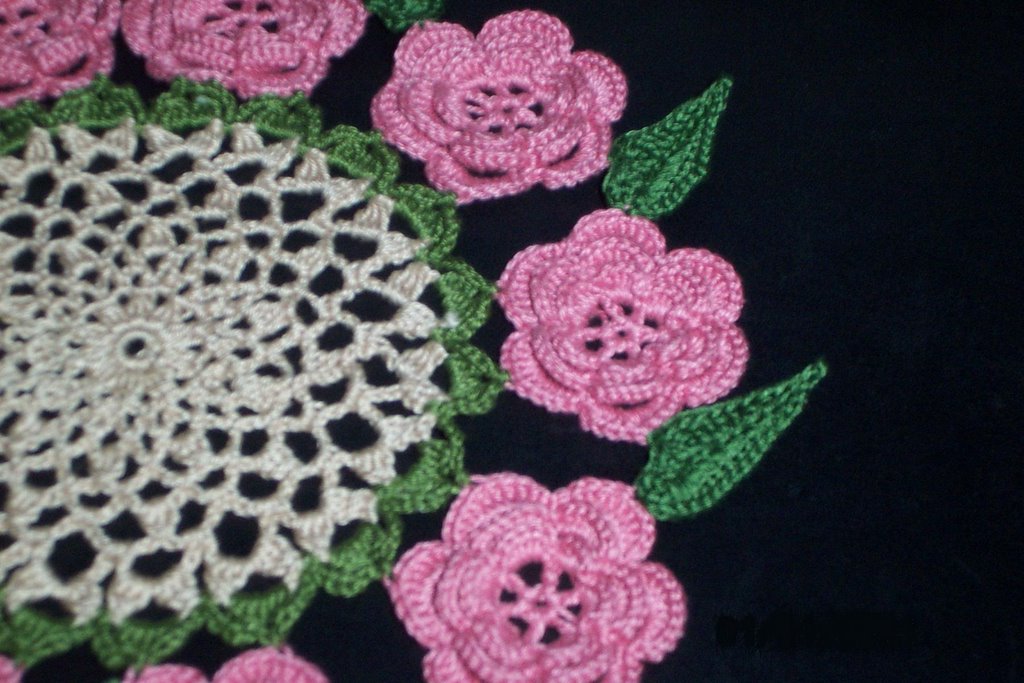 The finished doily center is about 5 1/4" diameter and the rose is about 2".


